
Attention! Disconnecting the battery deletes data from the memory blocks of the following systems:
- memory block of the self-diagnosis system, where malfunctions of various systems are recorded;
- a radio with an access code that prevents its unauthorized use is deleted from the specified code, as well as the settings on the radio stations. Therefore, before disconnecting the battery, make sure that the code is recorded and that it can be re-entered into the radio after the battery is connected. If the code is unknown to the owner of the car, then only a specialized workshop or its manufacturer can put the radio into operation.
Attention! As of 4/02, radios with a security code can only be put into operation by a suitable workshop.
Attention! Batteries contain poisonous components and must not be disposed of with household waste. Old batteries should be handed over to special points for recycling.
Removing
1. Disconnect all consumers of the on-board network and turn off the ignition. This ensures the safety of electronic control units.
2. Remove the cover covering the battery in the footwell on the passenger side. The lid is fastened with a rotary latch with a folding handle 1 (see illustration).
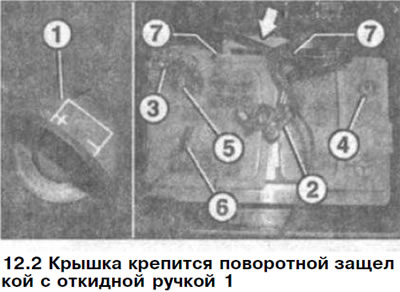
3. Remove the terminals from the battery poles. First, terminal 2 wires are disconnected «masses» (-), and then terminal 3 from positive (+) poles. wire terminal «masses» (-) fastened to pole 4 with a clamping bolt, and terminal 5 of wire 3 of the positive potential is closed with a cover (see illustration 12.2).
4. Using a wrench with an extension handle, unscrew the two bolts 7 of the battery clamp (see arrow in illustration 12.2) and remove the bracket.
Attention! If the battery will not be removed from the tray, then after disconnecting the terminals from its poles, insulate the poles to prevent a short circuit.
5. Before removing the battery from the tray, disconnect the gas outlet hose 6 on the side of the battery (see illustration 12.2).
6. Remove the battery from the plastic tray, being careful not to damage the electronics.
Installation
7. Before connecting the battery, make sure that all consumers of the on-board network are disconnected and the ignition is turned off.
8. Install the battery in the tray. Then make sure that the hose 1 of the central gas outlet is not pinched (see illustration 12.9).
9. Install and secure the clamping bracket 2. The flat side of the clamp should be pressed against the battery case (see illustration).
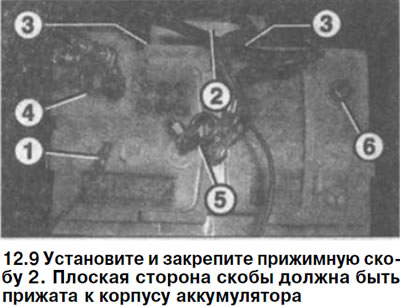
10. Tighten both bolts 3 securing the clamping bracket. The tightening must be sufficient to hold the battery in the tray, but the bracket must not press the wall of the battery case (see illustration 12.9).
11. Connect first wire terminal 4 to the positive (+) terminal and then wire terminal 5 «masses» (-) to the negative pole 6 (see illustration 12.9).
12. Connect hose 1 of the central gas outlet to the battery (see illustration 12.9).
Attention! An incorrectly connected battery can cause serious damage to the generator and the electrical system as a whole.
13. Enter the passcode into the radio and set it to receive radio stations automatically.
14. Adjust the power window unit. To do this, lower and then raise the windows. After closing the windows, keep the switch pressed for about one second.
15. Set up the digital clock.