



Note: For removal and installation procedures for some switches, refer to the chapters in this Manual that cover the relevant vehicle systems.
Models produced up to 30.06.02
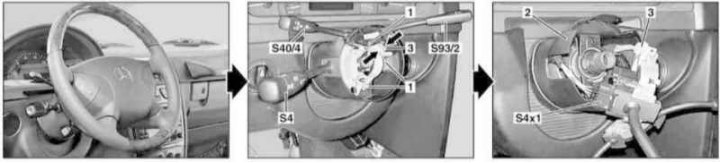
Installation details of steering column switches on models produced up to 30.06.02
1 - Screws; 2 - Lid; 3 - Electrical wiring connector; S4 - Combined steering column switch; S4x1 - Combination switch wiring connector; S40/4 - Cruise control/Speedtronic system switch; S93/2 - Linguatronic system switch (VCS/SBS)
1. On models with the corresponding configuration (code ET2), activate the service mode of the TELE AID emergency call system (see Section Activation/deactivation of the service mode of the TELE AID emergency call system).
2. Turn on the auxiliary battery and connect it to the standard battery, then disconnect the negative cable from the latter.
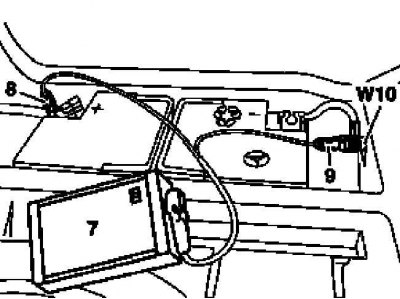
7 - Auxiliary battery
8 — Positive wire terminal of the module
9 — Terminal of the negative wire of the module
W10 - Battery ground
3. Remove the steering wheel contact cable drum (see Chapter Suspension and steering).
4. Loosen the screws (1) and remove the Speedtronic (S40/4) and Linguatronic (S93/2) system switches from the cover (2) of the steering column housing.
5. Unlock (arrows) and, pulling towards the steering wheel, disconnect the connector (3) from the combination switch housing (S4).
6. Remove the switch (S4) from the cover (2).
7. Disconnect the connector (S4x1).
8. Installation is carried out in the reverse order - on models with the corresponding configuration (code ET2) deactivate the service mode of the TELE AID system (see Section Activation/deactivation of the service mode of the TELE AID emergency call system).
9. Finally, read the DTC codes and clear the on-board diagnostic system memory using the STAR DIAGNOSIS scanner (6511 1801 00) (See Chapter Engine electrical systems) and enter the required basic settings of the on-board equipment.
10. Make sure that the steering column switches are functioning properly.
Models produced since 01.07.02
Cruise control/Speedtronic system and steering column adjustment switches
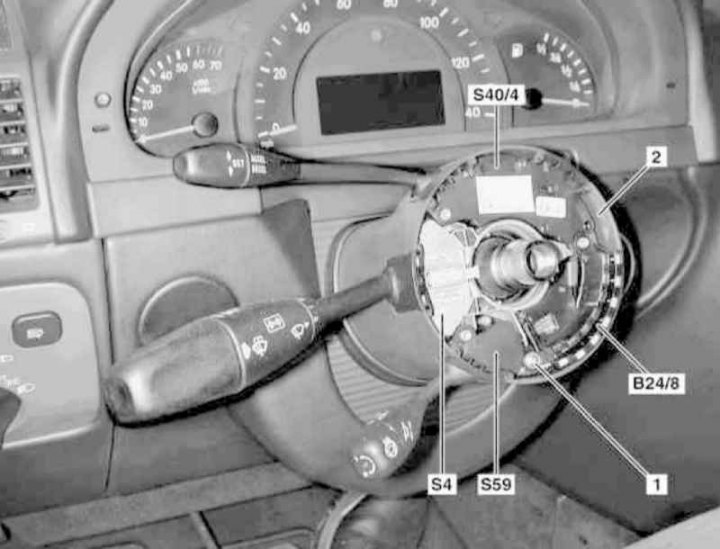
Installation details of cruise control/Speedtronic switch and steering column adjustment on models produced from 01.07.02
1 - Screw; 2 - Assembly of steering column switches; B24/8 - Steering wheel angle sensor; S4 - Combined steering column switch; S40/4 - Cruise control/Speedtronic system switch; S59 - Steering column adjustment switch
1. On models with the corresponding configuration (code ET2), activate the service mode of the TELE AID emergency call system (see Section Activation/deactivation of the service mode of the TELE AID emergency call system).
2. Turn on the auxiliary battery and connect it to the standard battery, then disconnect the negative cable from the latter.
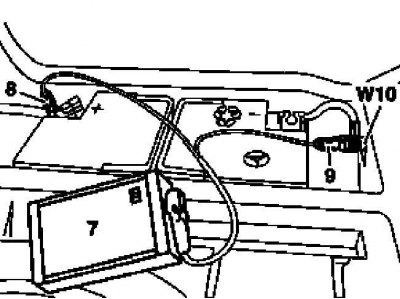
7 - Auxiliary battery
8 — Positive wire terminal of the module
9 — Terminal of the negative wire of the module
W10 - Battery ground
3. Remove the steering wheel and the contact cable drum (A45) (see Chapter Suspension and steering).
4. Remove the steering wheel angle sensor (B24/8) (see Chapter Suspension and steering).
5. Pull to release the cruise control/Speedtronic (S40/4) and/or steering column adjustment (S59) switches from the assembly (2).
6. Installation is carried out in the reverse order - do not forget to activate the sensor (B24/8), on models with the corresponding configuration (code ET2) deactivate the service mode of the TELE AID system (see Section Activation/deactivation of the service mode of the TELE AID emergency call system).
Material based on data from the portal (MERCEDESMAN)
7. Finally, read the DTC codes and clear the on-board diagnostic system memory using the STAR DIAGNOSIS scanner (6511 1801 00) (See Chapter Engine electrical systems) and enter the required basic settings of the on-board equipment.
8. Make sure that the steering column switches are functioning properly.
Steering Column Module and Combination Switch
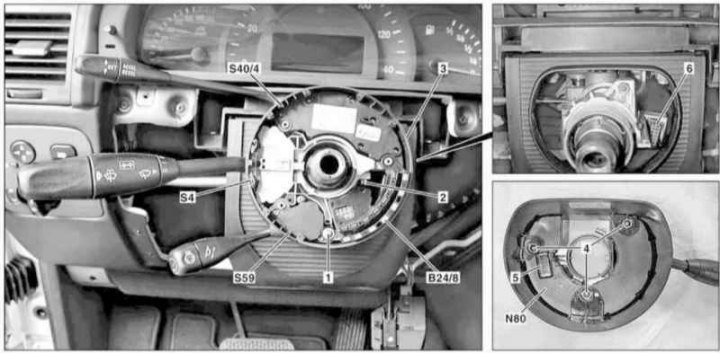
Installation details of the steering column module and combined steering column switch on models produced from 01.07.02.
1, 4 - Screws; 2 - Tie bolt; 3 - Assembly of steering column switches; 5, 6 - Electrical wiring connectors; B24/8 - Steering wheel angle sensor; N80 - Steering Column Module; S4 - Combined steering column switch; S40/4 - Cruise control/Speedtronic system switch; S59 - Steering column adjustment switch
1. On models with the corresponding configuration (code ET2), activate the service mode of the TELE AID emergency call system (see Section Activation/deactivation of the service mode of the TELE AID emergency call system).
2. Turn on the auxiliary battery and connect it to the standard battery, then disconnect the negative cable from the latter.
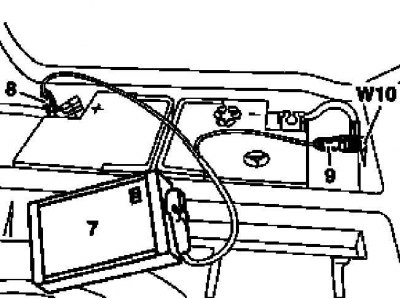
7 - Auxiliary battery
8 — Positive wire terminal of the module
9 — Terminal of the negative wire of the module
W10 - Battery ground
3. Remove the steering wheel contact cable drum (see Chapter Suspension and steering).
4. Remove the steering wheel angle sensor (B24/8) (see Chapter Suspension and steering).
5. Remove the cruise control/Speedtronic system switches (S40/4) and steering column adjustment switches (S59) (see above).
6. Unscrew the tightening screw (2) - the screw remains in the switch assembly (3).
7. Pull outward to release the switch assembly (3) from the steering column housing.
8. Remove the bolts (4) and remove the module (N80) from the assembly (3).
9. Separate the combination switch (S4) from the module (N80).
10. Installation is carried out in the reverse order - make sure that the connector (5/6) is securely latched.
11. On models with the corresponding configuration (code ET2), deactivate the service mode of the TELE AID system (see Section Activation/deactivation of the service mode of the TELE AID emergency call system).
12. Finally, read the DTC codes and clear the on-board diagnostic system memory using the STAR DIAGNOSIS scanner (6511 1801 00) (See Chapter Engine electrical systems) and enter the required basic settings of the on-board equipment.
13. Make sure that the steering column switches are functioning properly.