
Cars BMW Cars Volkswagen Cars Chevrolet Cars Land Rover Cars Lada Cars Honda Cars Peugeot
English Русский
Български
Беларускі
Український
Српски
Hrvatski
Română
Polski
Slovenský
Magyar
Bookmark News and articles Sitemap Feedback Site search
MercedesMan.ru


A-Class C-Class E-Class G-Class M-Class S-Class Others
W168 (1997-2004)
  • Main
  • A-Class
  • W168 (1997-2004)
  • Electrical equipment
  • Equipment and devices
  • Steering column switches — removal and installation

Steering column switches — removal and installation (Mercedes-Benz A-Class W168)

0
Contents: Removal ↡ Installation ↡
The switches for the turn signal, low and high beam headlights, and windshield wipers, mounted on the steering column, are so-called combined steering column switches and are therefore removed together.

Removal


1. Set the wheels to the straight ahead position.

2. Disconnect the ground (-) wire terminal from the negative battery terminal, after turning off the ignition.

Warning! When you disconnect the battery from the radio, the security code is deleted, as well as all automatic settings on the radio station. If the code is unknown or not written down, then the radio can only be put into operation by resorting to the help of a workshop or the manufacturer of the radio. Therefore, make sure in advance that the code is known.


Caution: Observe safety precautions when working with airbags.


3. Remove the steering wheel.

4. Unscrew the bolts 1 securing the contact coil so that the coil can be removed. The wheels of the car must be aligned and should stand straight (see illustration).

Article borrowed from the web portal: www.mercedesman.ru
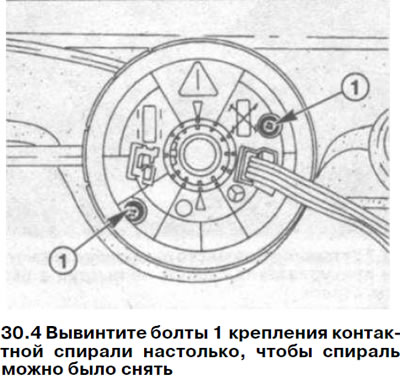
4. Unscrew the bolts 1 securing the contact coil so that the coil can be removed. The wheels of the…


Attention! The contact spiral mounting bolts must not be unscrewed completely. In this case, the spiral will unwind and will have to be installed in a workshop.


5. Carefully remove the coil from the steering column. The plug connection to the steering column switches is disconnected automatically.

6. Unscrew the three mounting bolts 1 and disconnect the steering column switches from the steering column (see illustration). The plug connection to the steering column switches is disconnected automatically.
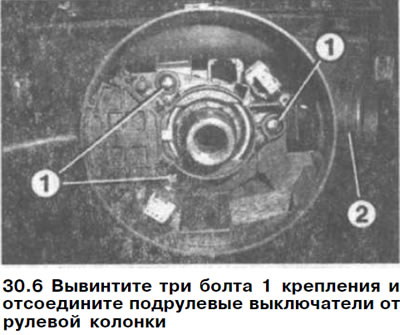
6. Unscrew the three mounting bolts 1 and disconnect the steering column switches from the steering…


Installation


7. Make sure the vehicle wheels are aligned and in the straight ahead position.

8. Connect the steering column switches and connect the plugs.

9. Secure the steering column switch with three bolts 1 (see illustration 30.6).

Attention! The short bolt is screwed in from the right side near the steering column lock 2. Otherwise, the lock is damaged (see illustration 30.6).


10. Install the contact spiral on the steering shaft near the plug connection and secure the plug.

11. Tighten the two mounting bolts. In this case, the reference marks (see arrows in the illustration) must stand opposite each other.
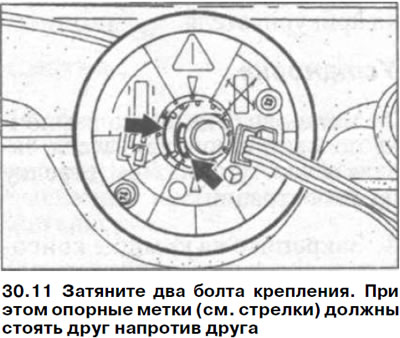
11. Tighten the two mounting bolts. In this case, the reference marks (see arrows in the…


12. Reinstall the steering wheel, observing the precautions for working with air bags.


13. Connect the negative (-) cable terminal to the battery, making sure the ignition is off first.

14. Set up the electronic clock.

15. Enter the security code into the radio receiver.
This article is available at: russian, bulgarian, belarusian, ukrainian, serbian, croatian, romanian, polish, slovak, hungarian
The article has been verified: Lukyanov Nikita Ilyich
Share with friends:
◀ Previous
A-Class W168 / Equipment and devices
Next ▶

Instrument cluster — removal and installation
Relay — removal and installation
Fuse box locations
Fuses — replacement
Sound signal — removal and installation
Cigarette lighter — removal and installation
Air Conditioner and Heater Switches — Removal and Installation
Lower Switch Block on the Center Console — Removal and Installation
Switches on the rear of the center console — removal and installation
Hazard warning light switch — removal and installation
More similar articles for repairing other models

☛ Steering column — removal, inspection and installation Mercedes 190 (W201) (1982-1993)
☛ Multi-function steering column switches Mercedes W124 (1984-1995)
☛ Removal and installation steering column switches Mercedes W463 (1999-2019)
☛ Disassembling the mechanical steering column adjuster Mercedes W163 (1997-2005)
☛ Memory for adjustable rear view mirrors and telescopic steering column Mercedes W140 (1991-1998)
☛ Steering column Mercedes Vito 2 (2003-2014, diesel)
Link in different formats to this article
Comments and feedback from visitors
No comments yet


How much will 46 + 18 ?


W168 (1997-2004) 
  • General information
  • User manual
  • Maintenance
  • Troubleshooting
  • Power unit
  • Engine repair
  • Cooling and heating
  • Injection system (gasoline)
  • Fuel system (diesel)
  • Fuel system
  • Exhaust system
  • Ignition system
  • Transmission
  • Clutch
  • Transmission
  • Chassis
  • Brake system
  • Suspension
  • Steering
  • Body
  • Interior (all models)
  • Interior (since 1997)
  • Interior (since 2001)
  • Exterior
  • Doors and windows
  • Electrical equipment
  • Equipment and devices
  • Power devices
  • Windshield wipers and washers
  • Headlights and lighting
  • Electrical circuits
 
MercedesMan.ru © 2017–2026 · Mobile version · Read about Mercedes · Sitemap: EN BG BY UA RS HR RO PL SK HU · Feedback · Site search · Bookmark A-Class (W168) · C-Class (W201) · C-Class (W202) · C-Class (W203) · E-Class (W123) · E-Class (W124) · E-Class (W210) · G-Class (W463) · M-Class (W163) · S-Class (W116, petrol) · S-Class (W126, petrol) · S-Class (W140) · S-Class (W220) · Sprinter · Vito 1 · Vito 2 · Vario 814D ·
 
We only use cookies without which some of the site's features may not be available.