
Cars BMW Cars Volkswagen Cars Chevrolet Cars Land Rover Cars Lada Cars Honda Cars Peugeot
English Русский
Български
Беларускі
Український
Српски
Hrvatski
Română
Polski
Slovenský
Magyar
Bookmark News and articles Sitemap Feedback Site search
MercedesMan.ru


A-Class C-Class E-Class G-Class M-Class S-Class Others
W168 (1997-2004)
  • Main
  • A-Class
  • W168 (1997-2004)
  • Electrical equipment
  • Equipment and devices
  • Relay — removal and installation

Relay — removal and installation (Mercedes-Benz A-Class W168)

0
Contents: Relay Block #1 ↡ Relay Block #2 ↡

Relay Block #1


This relay box is located along with the fuse box under a cover at the bottom of the instrument panel in the passenger side footwell.

This block contains the relays for the fuel pump, engine control unit, ESP and rear window heater.

1. Lift the fuse box cover latch release handle and rotate the latch to the left and remove the cover.

2. Remove the faulty relay using tweezers, such as HAZET 4770-1 (see arrows in the illustration).
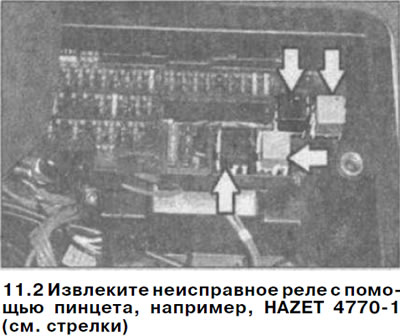
2. Remove the faulty relay using tweezers, such as HAZET 4770-1 (see arrows in the illustration).


Relay Block #2


This relay box is located in the engine compartment on the right side when looking in the direction of travel.

3. Open the hood.

4. Using a socket wrench, unscrew the three bolts 1 and release the relay box cover from the side fasteners 2 (see illustration).
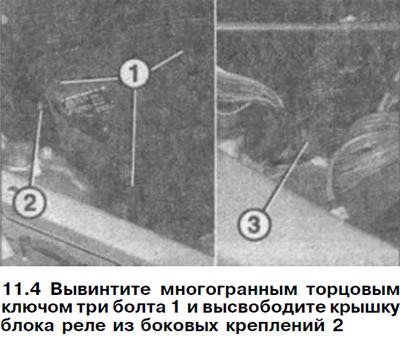
4. Using a socket wrench, unscrew the three bolts 1 and release the relay box cover from the side…


5. Remove the foam inserts.


6 Remove the faulty relay 3 using tweezers, e.g. HAZET 4770-1 and replace it with a new one (see illustration 11.4).

7. Replace the foam inserts.

8. Install the relay box cover and secure it with three socket head bolts.
This article is available at: russian, bulgarian, belarusian, ukrainian, serbian, croatian, romanian, polish, slovak, hungarian
The article has been verified: Lukyanov Nikita Ilyich
Share with friends:
◀ Previous
A-Class W168 / Equipment and devices
Next ▶

Fuse box locations
Fuses — replacement
Sound signal — removal and installation
Rear Window Defogger — Check
Disconnecting plug connections
Instrument cluster — removal and installation
Steering column switches — removal and installation
Cigarette lighter — removal and installation
Air Conditioner and Heater Switches — Removal and Installation
Lower Switch Block on the Center Console — Removal and Installation
More similar articles for repairing other models

☛ Heating control relay Mercedes W202 (1993-2000)
☛ Checking the thermal time relay Mercedes W123 (1976-1985)
☛ Removal and installation fuse and relay mounting blocks Mercedes W463 (1999-2019)
☛ Combination Relay — Installation Details Mercedes W140 (1991-1998)
☛ Pre-heating relay Mercedes Vito 1 (1996-2003)
Link in different formats to this article
Comments and feedback from visitors
No comments yet


How much will 44 + 36 ?


W168 (1997-2004) 
  • General information
  • User manual
  • Maintenance
  • Troubleshooting
  • Power unit
  • Engine repair
  • Cooling and heating
  • Injection system (gasoline)
  • Fuel system (diesel)
  • Fuel system
  • Exhaust system
  • Ignition system
  • Transmission
  • Clutch
  • Transmission
  • Chassis
  • Brake system
  • Suspension
  • Steering
  • Body
  • Interior (all models)
  • Interior (since 1997)
  • Interior (since 2001)
  • Exterior
  • Doors and windows
  • Electrical equipment
  • Equipment and devices
  • Power devices
  • Windshield wipers and washers
  • Headlights and lighting
  • Electrical circuits
 
MercedesMan.ru © 2017–2026 · Mobile version · Read about Mercedes · Sitemap: EN BG BY UA RS HR RO PL SK HU · Feedback · Site search · Bookmark A-Class (W168) · C-Class (W201) · C-Class (W202) · C-Class (W203) · E-Class (W123) · E-Class (W124) · E-Class (W210) · G-Class (W463) · M-Class (W163) · S-Class (W116, petrol) · S-Class (W126, petrol) · S-Class (W140) · S-Class (W220) · Sprinter · Vito 1 · Vito 2 · Vario 814D ·
 
We only use cookies without which some of the site's features may not be available.