
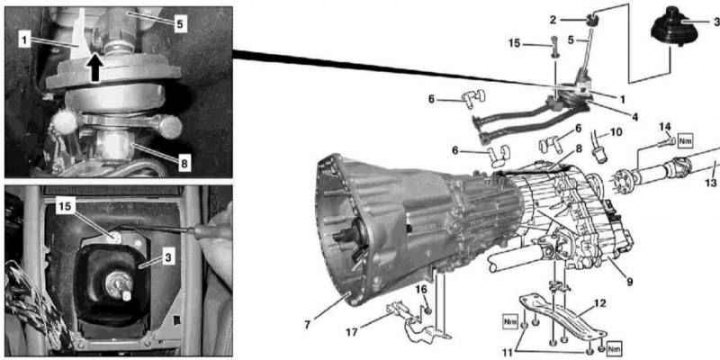
Details of installation of the gear shift lever RKPP 716.644 (ML 270 CDI)
1 - The base of the lever assembly; 2 - Coupling; 3 - Protective cover; 4 - Boot; 5 - Switching lever; 6 - Mounting pins; 7 - Carter manual transmission; 8 - Switching rod; 9 - Transfer box; 10 - Contact connector for electrical wiring; 11 - Nuts; 12 - Cross beam with rear suspension support of the power unit; 13 - Rear driveshaft; 14 - Bolts; 15 - Bolt; 16 - Nuts; 17 - Bolt plate
1. Details of the installation of the shift lever RKPP 716.644 are shown in the illustration, which includes all references in the text.
2. Engage neutral gear.
3. Remove the handle and shift lever cover.
4. Remove the protective cover (3) - Try not to over-bend the locking tabs.
5. Remove the bolt (15).
6. Release the clips and remove the boot (4) - Try not to over-bend the locking tabs.
7. Give nuts (16) and remove the bolt plate (17).
8. Turn out bolts (14), disconnect from the transfer case (9) rear driveshaft (13), move it aside and tie it to the vehicle frame, taking care not to place undue stress on the universal joint and center bearing assembly (see chapter Suspension and steering).
9. Disconnect the wiring (10) from the executive electric motor.
10. Support the transmission (7) and give nuts (11).
11. Slightly lower the transmission assembly - try not to damage the communication lines.
12. Once unlocked, remove the retaining pin (6) and disconnect from transmission (7) lever assembly (1).
13. Pulling down, remove the assembly (1).
14. Installation is carried out in the reverse order - make sure that when connecting to the lever (5) switching rod (8) the guide on the lever was on the side of the reverse gear lock at the base of the lever assembly (1) (arrow).
15. In conclusion, check the correct functioning of the switching mechanism.