
Cars BMW Cars Volkswagen Cars Chevrolet Cars Land Rover Cars Lada Cars Honda Cars Peugeot
English Русский
Български
Беларускі
Український
Српски
Hrvatski
Română
Polski
Slovenský
Magyar
Bookmark News and articles Sitemap Feedback Site search
MercedesMan.ru


A-Class C-Class E-Class G-Class M-Class S-Class Others
W163 (1997-2005)
  • Main
  • M-Class
  • W163 (1997-2005)
  • Electrical equipment
  • Equipment and devices
  • Removal and installation of mounting blocks

Removal and installation of mounting blocks (Mercedes-Benz M-Class W163)

0
Main Assembly Block Installation Details
Main Assembly Block Installation Details


Main Assembly Block Installation Details

Main Assembly Block Installation Details


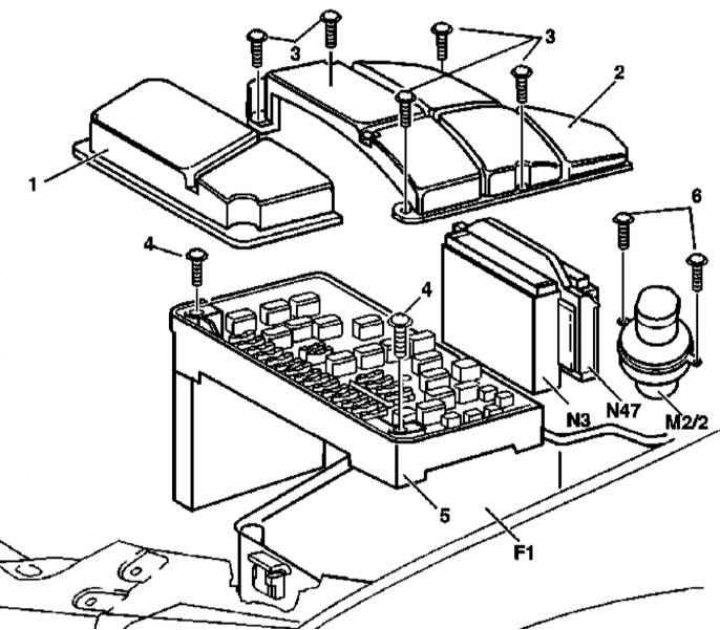
1. The main mounting block is located on the left side of the engine compartment and consists of two separate sections: the fuse/relay section and the control module section. The installation details of the main mounting block are shown in the illustrations to which all references in the text refer.

(Original article is on the portal: «www.mercedesman.ru»)

2. Open the hood and fix it in a vertical position.

3. Disconnect the negative cable from the battery.

4. Release the clamps and remove the fuse compartment cover (1), - check the condition of the sealing gasket, replace it if necessary.

5. Loosen the fastening screws (3) and remove the control module section cover (2) - replace the gasket if necessary.


6. Remove the screws (4) and lift up to release the fuse/relay holder (5).

7. After releasing the clamps and unscrewing the fastening screws, disconnect the electrical wiring connectors and finally remove the holder - the holder connectors have an asymmetrical design, which determines the uniqueness of their connection.

8. Remove the fuel injection system (ME-SFI) and traction control system (ETS/ESP) control modules (see Section Removal and installation control modules).

9. Remove the screws (6).

10. Disconnect the electrical wiring from the electric motor (M2/2) of the control module section blower fan.

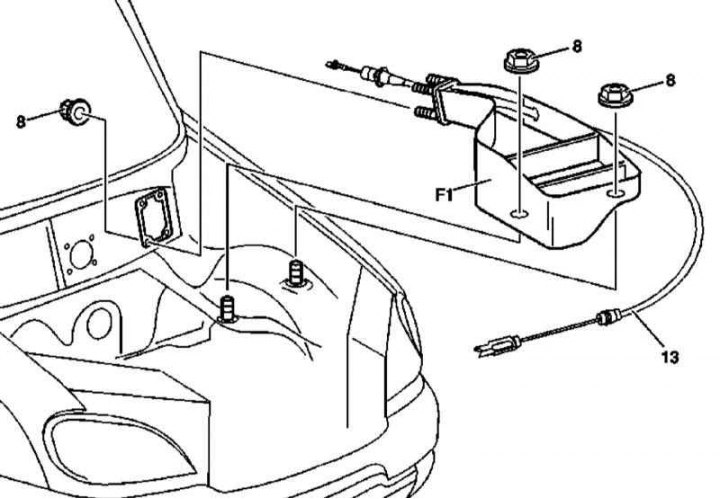
11. Release the wiring harness assembly with its support bracket from the fuse and relay module (F1) and move it behind the mounting block.

12. Remove the cover on the left under the instrument panel, disconnect the hood latch release cable assembly (13) from its lever and release it from the mounting block.

13. Remove the fastening nuts (8).

14. Disconnect the connectors of the electrical wiring that passes through the fuse/relay module and is not connected to the junction block inside the latter.

15. Pull back the wiring harness and release the windshield washer fluid supply hoses from the support brackets on the mounting block.

16. Remove the washer fluid reservoir (see Chapter Body).

17. Remove the main mounting block.

18. Installation is carried out in reverse order.

Removal and installation the interior fuse and relay box


Interior mounting block installation details

Interior mounting block installation details


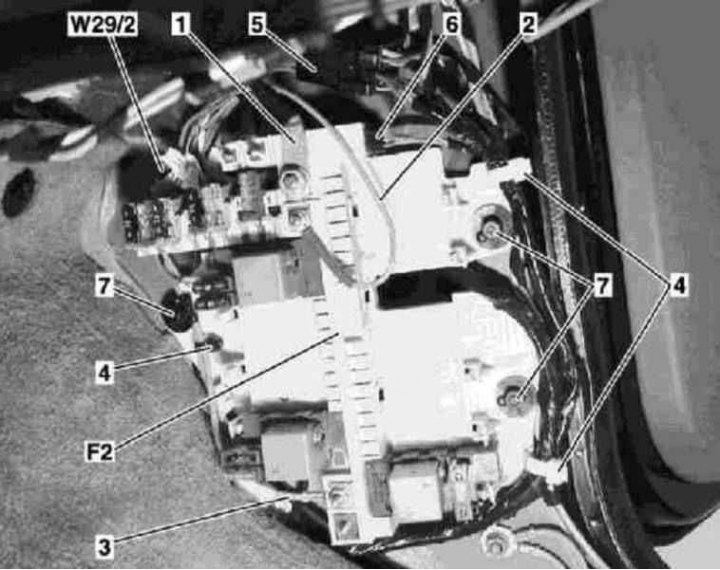
1. The details of installing the cabin mounting block in the passenger footwell are shown in the illustration, to which all references in the text refer.

2. Remove the cover on the right under the instrument panel and the side trim panel of the passenger footwell (see Chapter Body).

3. Disconnect the 30 (1) and 15R (2) circuit cables from the fuse/relay mounting block (F2) in the footwell.

4. Remove the cable ties (4) - try not to damage the electrical wiring harnesses.

5. Disconnect and remove the contact connector (5) from pillar A - loosen the fastening nut on the rear side of the connector and push the latter forward.

6. Disconnect the contact connector (6).

7. Loosen the nut securing the ground busbar (W29/2) to pillar A and disconnect the cable (3) of circuit 31 from the ground.

8. Loosen the plastic nuts (7) and remove the interior fuse and relay box (F2) from the right front leather well.

9. Installation is carried out in the reverse order - make sure that the electrical wiring is properly calcined.
This article is available at: russian, bulgarian, belarusian, ukrainian, serbian, croatian, romanian, polish, slovak, hungarian
The article has been verified: Panova Maya Vladimirovna
Share with friends:
◀ Previous
M-Class W163 / Equipment and devices
Next ▶

Digital data bus CAN
Relays — general information and checking the correct functioning
Circuit Breakers — General Information
Fuses — General Information
Search for causes of electrical equipment failures
Removal and installation control modules
Removal and installation the CAN bus adapter
Removal and installation the instrument cluster
Replacing the lamp of the rotary push-button temperature selection module
Removal and installation on-board power sockets
More similar articles for repairing other models

☛ Tightening the mounting bolts on the steering gear Mercedes W202 (1993-2000)
☛ Relay and fuse box mounting block Mercedes W210 (1996-2002)
☛ Disconnecting and connecting electrical wiring of mounting blocks and… Mercedes W463 (1999-2019)
☛ Disassembly and assembly of the output shaft with the central and… Mercedes W140 (1991-1998)
☛ Replacing the silent blocks of the transverse levers Mercedes Sprinter (1995-2000, diesel)
Link in different formats to this article
Comments and feedback from visitors
No comments yet


How much will 15 + 38 ?


W163 (1997-2005) 
  • General information
  • Introduction to the guide
  • Controls and instruments
  • Driving and operation
  • Maintenance
  • Power unit
  • Gasoline engines
  • Diesel engines
  • Cooling system
  • Heating and ventilation
  • Power system (gasoline)
  • Fuel system (diesel)
  • Exhaust system
  • Ignition and control system
  • Charging and starting system
  • Transmission
  • Mechanical gearbox
  • Automatic gearbox
  • Clutch
  • Drive shafts and cardan
  • Transfer case
  • Chassis
  • Brake system
  • Front suspension
  • Rear suspension
  • Steering
  • Suspension geometry
  • Body
  • Exterior (external elements)
  • Interior (internal elements)
  • Doors and locks
  • Electrical equipment
  • Equipment and devices
  • Drive motors
  • Lighting and signaling
  • Audio system
  • Electrical circuits
 
MercedesMan.ru © 2017–2026 · Mobile version · Read about Mercedes · Sitemap: EN BG BY UA RS HR RO PL SK HU · Feedback · Site search · Bookmark A-Class (W168) · C-Class (W201) · C-Class (W202) · C-Class (W203) · E-Class (W123) · E-Class (W124) · E-Class (W210) · G-Class (W463) · M-Class (W163) · S-Class (W116, petrol) · S-Class (W126, petrol) · S-Class (W140) · S-Class (W220) · Sprinter · Vito 1 · Vito 2 · Vario 814D ·
 
We only use cookies without which some of the site's features may not be available.