
Cars BMW Cars Volkswagen Cars Chevrolet Cars Land Rover Cars Lada Cars Honda Cars Peugeot
English Русский
Български
Беларускі
Український
Српски
Hrvatski
Română
Polski
Slovenský
Magyar
Bookmark News and articles Sitemap Feedback Site search
MercedesMan.ru


A-Class C-Class E-Class G-Class M-Class S-Class Others
W463 (1999-2019)
  • Main
  • G-Class
  • W463 (1999-2019)
  • Electrical equipment
  • Audio system and navigation
  • Removal and installation of antenna amplifiers

Removal and installation of antenna amplifiers (Mercedes-Benz G-Class W463)

0
Contents: Radio/TV tuner antenna amplifier ↡ Single Lock IR Receiver Antenna…↡
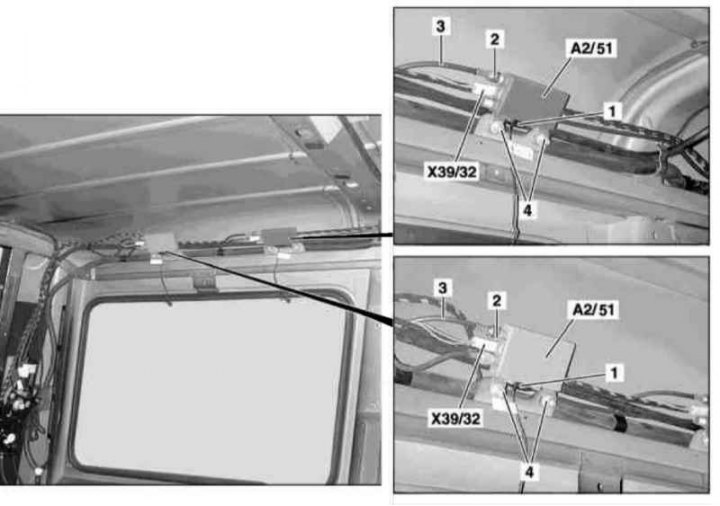
Radio/TV tuner antenna amplifier


Radio/TV Tuner Antenna Amplifier Installation Details

Radio/TV Tuner Antenna Amplifier Installation Details
1 - Connector of the cable of the antenna glued to the glass; 2 - Knurled nut; 3 - Antenna cable; 4 - Fastening nuts; A2/51 - Antenna amplifier; X39/32 - Power supply harness connector


1. On models with the corresponding configuration (code ET2), activate the service mode of the TELE AID emergency call system (see Section Activation/deactivation of the service mode of the TELE AID emergency call system).

2. Disconnect the negative cable from the battery.

3. Remove the ceiling trim (see Chapter Body).

4. Disconnect the connector (X39/32) of the power supply harness.

5. Loosen the knurled nut and disconnect the antenna cable connector (3).

6. Loosen the mounting nuts (4) and remove the amplifier (A39/32) of the radio/TV tuner antenna

7. Installation is carried out in the reverse order - on models with the corresponding configuration (code ET2) deactivate the service mode of the TELE AID system (see Section Activation/deactivation of the service mode of the TELE AID emergency call system).


8. Finally, read the DTC codes and clear the on-board diagnostic system memory using the STAR DIAGNOSIS scanner (6511 1801 00) (See Chapter Engine electrical systems) and perform basic programming procedures.

Single Lock IR Receiver Antenna Amplifier
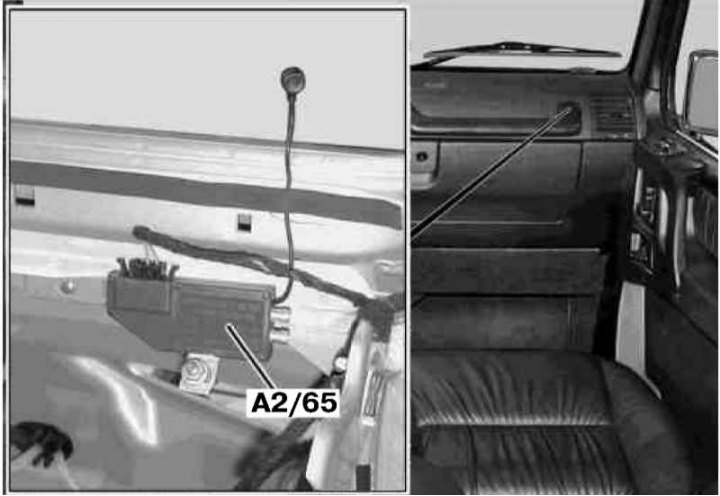


Installation details of the amplifier (A2/65) of the antenna of the IR receiver of the single lock

Installation details of the amplifier (A2/65) of the antenna of the IR receiver of the single lock


1. Remove the instrument panel (see Chapter Body).

2. Remove the signal wiring coming from the antenna module (A2/65).

3. Carefully release the antenna connecting wire from the retainer on the windshield.

4. Disconnect the electrical wiring from the antenna amplifier (A2/65).

5. Release the fastener, separate the amplifier (A2/65) from the body panel and remove it from the car.

6. Installation is carried out in the reverse order - do not forget to replace the foam rubber sealing strips.
This article is available at: russian, bulgarian, belarusian, ukrainian, serbian, croatian, romanian, polish, slovak, hungarian
The article has been verified: Polyakov Zakhar Grigorievich
Share with friends:
◀ Previous
G-Class W463 / Audio system and navigation
Next ▶

Removal and installation CD changer / TV tuner
Removal and installation the radio
Removal and installation of antenna units
Removal and installation the antenna splitter
Removal and installation speakers
Removal and installation of the transceiver of the Handsfree mobile telephone system
Removal and installation the mobile phone interface
More similar articles for repairing other models

☛ Roof Radio Antenna — Removal and Installation Mercedes W168 (1997-2004)
☛ Antenna — removal and installation Mercedes W202 (1993-2000)
☛ Removal and installation the antenna splitter Mercedes W163 (1997-2005)
☛ Electric antenna drive (except models with built-in cell phone and… Mercedes W140 (1991-1998)
Link in different formats to this article
Comments and feedback from visitors
No comments yet


How much will 31 + 38 ?


W463 (1999-2019) 
  • General information
  • Introduction to the guide
  • Controls and instruments
  • Driving and operation
  • Maintenance
  • Power unit
  • Engine repair
  • Cooling system
  • Heating and ventilation
  • Power system (gasoline)
  • Fuel system (diesel)
  • Exhaust system
  • Ignition and control system
  • Charging and starting system
  • Transmission
  • Automatic gearbox
  • Transfer case
  • Axles front and rear
  • Chassis
  • Brake system
  • Front suspension
  • Rear suspension
  • Steering
  • Body
  • Exterior (external elements)
  • Interior (internal elements)
  • Doors, locks and windows
  • Electrical equipment
  • Equipment and devices
  • Switches in salon
  • Headlights and lighting
  • Audio system and navigation
  • Electrical circuits
 
MercedesMan.ru © 2017–2026 · Mobile version · Read about Mercedes · Sitemap: EN BG BY UA RS HR RO PL SK HU · Feedback · Site search · Bookmark A-Class (W168) · C-Class (W201) · C-Class (W202) · C-Class (W203) · E-Class (W123) · E-Class (W124) · E-Class (W210) · G-Class (W463) · M-Class (W163) · S-Class (W116, petrol) · S-Class (W126, petrol) · S-Class (W140) · S-Class (W220) · Sprinter · Vito 1 · Vito 2 · Vario 814D ·
 
We only use cookies without which some of the site's features may not be available.