



Contents: Low maintenance battery ↡ Maintenance free battery ↡ Batteries of all types ↡ Checking the fastening of the…↡ Checking the battery under load ↡ Charger ↡ Fast Charging/Start Assist ↡
Low maintenance battery
1. If the annual mileage of the car is small, to check the battery charge, measure the specific gravity of the electrolyte every three months. Measure the specific gravity with a hydrometer and compare the result with the one in the table below.
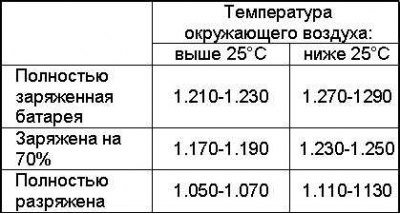
Please note that the data is given for an electrolyte temperature of 15°C. For every 10°C increase in temperature, add 0.007, for every 10°C decrease, subtract 0.007.
2. If the battery condition is of concern, check the specific gravity of the electrolyte in each cell. A difference of more than 0.040 indicates loss of electrolyte or damage to the plates.
3. If the difference in density exceeds 0.040, the battery must be replaced. If the difference in density is satisfactory, but the battery is discharged, it must be charged and the density of the electrolyte must be checked. The sequence of actions during charging is given below.
Maintenance free battery
1. If the car is equipped with a sealed battery, it is impossible to check the density of the electrolyte and restore its level. The battery condition can be checked using a built-in indicator or an external voltmeter.
2. Some models are equipped with maintenance-free batteries, in the body of which the charge level indicator is built in. It is located on top and changes its color when the battery charge level changes. If the indicator is green, the battery is fully charged, if the indicator is red, the battery needs to be charged. The sequence of actions for charging the battery is given below in this Section. Batteries from other manufacturers may also have a built-in charge level indicator. In this case, follow the instructions given in the operating instructions for the battery.
Batteries of all types
1. When checking the battery with an external voltmeter, connect it to the terminals and compare the result with the data given in the Specifications. The measurement result will be correct if the battery has not been charged for at least the last 6 hours. If it has been charged, turn on the headlights for 30 seconds, then wait 5 minutes and check the voltage at the terminals. All other electrical equipment (including even interior lighting) in this case it must be enabled.
2. If the measurement result is less than 12.0 V, the battery is discharged, and a voltage from 12.0 to 12.4 indicates partial discharge.
3. If the battery needs to be charged, remove it from the vehicle (refer to Section Checking battery condition, care and charging) and charge it following the procedure below.
Checking the fastening of the battery terminals and holder
Note: If the battery is not properly secured or the terminals are not secured, the result may be premature failure of the battery due to vibration, cable fire or electrical equipment malfunction. Since the data of electronic memory units, such as the radio, is erased when the battery is not connected, read the notes on removing and installing the battery, and refer to Section Checking battery condition, care and charging.
1. Move the battery terminals in different directions and check the reliability of their fastening, tighten if necessary.
2. If the battery is not securely fastened, tighten the mounting bolt to a torque of 20 H•m.
Checking the battery under load
1. Connect a voltmeter to the battery terminals.
2. Start the engine and check the voltage.
3. When starting the engine with a fully charged battery, the voltage should not fall below 10 V (at an electrolyte temperature of about +20°C).
4. If the voltage drops sharply and the density of the electrolyte in different sections is different, the battery is damaged and must be replaced.
Charger
The following sequence of actions may differ from that recommended by the manufacturer of the battery installed in the vehicle. In this case, use the manufacturer's recommendations.
Conventional and low maintenance battery
1. The battery should be charged with a current equal to 10% of the capacity (for example, if the battery capacity is 45 Ah, it should be charged with a current of 4.5 Amperes) until the density of the electrolyte in the cans increases within 4 hours.
2. On the other hand, an automatic charger with a current of about 1.5 amps can be left on all night.
3. It is not recommended to use "fast" type chargers, which supposedly can fully charge the battery in a couple of hours, since at high currents the battery plates can overheat and be destroyed.
4. When charging the battery, ensure that the electrolyte temperature does not exceed 37.8°C.
Charging a maintenance free battery
1. This type of battery will take longer to fully charge than a low-maintenance or regular battery. The charging time depends on the state of charge and can take up to three days.
2. The voltage generated by the charger should be in the range of 13.9 - 14.9 volts, the current should not exceed 25 amperes. Under these conditions, the battery can be used in 3 hours, the voltage at the terminals should be about 12.5 volts. Achieving a full charge will take longer.
3. Before charging the battery, read the safety precautions in Section Checking battery condition, care and charging:
- Do not disconnect the battery while the engine is running.
- Never short-circuit the battery, i.e. connect the positive (+) and negative (-) poles. This will cause the battery to heat up and may crack.
- Do not use open flame near the battery. The electrolyte is poisonous. Do not allow it to come into contact with your eyes, skin or clothing. Otherwise, rinse the electrolyte thoroughly with water.
- In a battery with a central gas outlet, when charging, plugs (phillips head) don't turn it inside out.
- Before charging a frozen battery, let it defrost. A charged battery freezes at about 65°C, a half-charged battery at about 30°C, and a discharged battery at about 12°C. After defrosting, check the battery for cracks. Replace if necessary.
- When charging the battery with a normal charger or a fast charger, remove the battery. At a minimum, disconnect the negative (-) and positive (+) cables.
- When using a portable charger (low current) charging can be done without removing the battery. There is no need to disconnect the connecting cable to the vehicle electrical system. Naturally, the battery manufacturer's data must be taken into account.
Charging a deeply discharged and sulfated battery
Battery that has not been used for a long time (for example, when the car is parked for a long time), becomes discharged and sulfated over time.
If the battery open circuit voltage is below 11.6 V, the battery is considered to be deeply discharged. Check the idle voltage, and refer to the subsection "Checking the battery".
In a deeply discharged battery, the electrolyte consists almost entirely of water.
Note: At sub-zero temperatures, such a battery may freeze and the battery case may crack.
A heavily discharged battery becomes sulfated, i.e. large, poorly soluble lead sulfide crystals form on the surface of the electrodes. The electrolyte loses its transparency and acquires a faint white color.
If a deeply discharged battery is charged immediately after discharge, sulfation occurs again. Otherwise, the battery plates continue to harden and the ability to charge the battery for a long time remains limited.
A heavily discharged and sulphated battery should be charged with a reduced current of about 5%, i.e., for example, with a battery capacity of 60 Ah, the charging current should be 3 A.
The charging voltage should not exceed 14.4 V.
Note: Never charge a deeply discharged battery with a fast charger.
Fast Charging/Start Assist
Use a fast charger to charge the battery only to start the vehicle. The charging current should be 20% or more of the battery capacity. This will damage the battery because it is exposed to high currents. A battery that has not been used for a long time and is very discharged should not be charged with a fast charger because this will cause sulfation.