



Contents: Car wash ↡ Care of varnish coating ↡ Outdoor Lighting Diffusers ↡ Care of plastic parts ↡ Glass cleaning ↡ Caring for rubber seals ↡ Tire cleaning ↡ Bottom protection and cavity…↡ Engine cleaning and preservation ↡ Caring for and cleaning seat covers ↡ Repairing damage from rock strikes ↡
Car wash
Environmental protection laws prohibit washing cars in unauthorized places.
If the car is often washed in automatic car washes, the rotating brushes of the car wash leave marks on the varnish coating. This can be avoided by washing the car manually at an appropriate car wash.
Bird droppings, dead insects, tree resin, traces of tar, salt and other aggressive deposits must be washed off immediately, as they contain substances that corrode the varnish coating.
Follow the instructions regarding the use of the washing machine, the pressure at which water is supplied to the vehicle, and the distance from which water should be supplied to the vehicle during washing.
Use plenty of water when washing. Avoid spraying the car with a strong stream of water at a sharp angle. This will damage the paintwork.
Wash the car with a soft sponge or glove, starting from the roof and then from top to bottom, pressing lightly. Squeeze the sponge frequently.
Use detergents only to remove hardened dirt. Then rinse off the detergent residue with plenty of clean water. Regular use of detergent requires more frequent preservation. A preservative can be added to the water used to wash the car.
Clean the air inlet vents with a gentle stream of water only.
Do not direct the high-pressure water jet directly at the radiator or at areas with damaged paintwork.
Use a chamois cloth to wipe dry. Use different types of chamois to wipe the varnish and glass, because the remains of preservatives on the glass lead to a deterioration in its transparency.
Traces of salt used on roads in winter are especially dangerous for all folds and bends, flanges and joints of doors and bonnet.
Therefore, such places must be thoroughly cleaned with a sponge every time you wash your car, including even after an automatic car wash, then rinsed with water and wiped dry with a dry chamois cloth.
Never wash or dry your car in the sun. This will inevitably cause water spots.
Attention! After washing the car, dry the brake discs by lightly braking while driving.
Care of varnish coating
Conservation
The clean, dry-wiped varnish coating should be coated with a preservative at such intervals and as often as necessary to provide protection of the surface from the weather with a water-repellent and pore-closing wax composition.
Any fuel, oil, grease or brake fluid that gets on the paintwork must be removed immediately, otherwise it will cause the paintwork to become discolored.
When you wash your car and it is clearly visible that water is not dripping off the varnish coating in droplets, you should immediately apply a preservative. Otherwise, the varnish will dry out.
Another way to preserve the varnish coating is to use wax compounds used when washing a car.
However, they provide good protection only if they are used at every car wash and only if the period between two washes does not exceed 2-3 weeks.
Use varnish preservatives containing natural or synthetic wax.
Polishing
Polishing is only necessary when the varnish coating has lost its original appearance due to insufficient care or exposure to dust, industrial emissions, sun and rain and no longer becomes shiny even with the use of preservatives.
You should not use highly abrasive polishing agents or polishing agents with increased chemical aggressiveness for this purpose, even if the first attempt at such polishing was successful.
Before each polishing, the car must be washed thoroughly and wiped dry. Subsequently, follow the manufacturer's instructions for using the polishing agent.
Avoid treating a large area at once to avoid premature drying of the polish.
Most polishes require the application of a preservative after use.
Do not polish in direct sunlight!
Plastic and matt lacquered parts must not be treated with polishing and preservative agents, as this will usually result in stains.
Removal resin/tar stains
Fresh stains can be removed with a soft cloth soaked in cleaning gasoline. If necessary, you can also use gasoline, kerosene or turpentine oil.
A varnish preservative also works very well against such stains. When using it, you can avoid subsequent washing.
Insect Removal
Insects contain aggressive substances that damage the varnish coating. Therefore, the affected areas should be washed immediately with warm soapy water or a detergent solution. There are also special products for removing insects.
Outdoor Lighting Diffusers
The headlight and taillight lenses are made of plastic. They should be washed with a soft sponge or soft cloth dampened with water*. Do not wipe the lenses with a dry sponge or cloth, or use scrapers to remove snow and ice, abrasive cleaning agents or solvents.
Care of plastic parts
Clean plastic parts, leatherette seats, headliner, matt black parts only with water with added shampoo. Do not soak the headliner through and through. Plastic parts can be cleaned with a suitable plastic cleaner.
Glass cleaning
Remove snow and ice from glass and mirrors with a plastic scraper. To avoid scratches from dirt, move the scraper in one direction only. Wipe the glass inside and outside with a clean soft cloth.
For heavy dirt, alcohol or ammonia and warm water or a special glass cleaner will help.
When cleaning the windshield, fold the wiper arms forward.
When cleaning the windshield, also clean the wiper blades.
Attention! When using products containing silicone, brushes, sponges, rags and towels used for cleaning the varnish coating cannot be used for cleaning glass. When spraying varnish products containing silicone, the glass must be covered with thick paper or other material.
Caring for rubber seals
Sprinkle talc or spray silicone compound on the sealing and sliding surfaces of rubber gaskets. This will prevent creaking when closing the doors. Rubbing the above-mentioned surfaces with liquid soap also reduces noise.
Tire cleaning
Do not wash tires with a water jet from a steam jet unit. If the spray nozzle of the washing unit is brought too close to the surface of the tire, its inner rubber layer will be irreversibly destroyed within a few seconds, even when using cold water. For safety reasons, tires washed in this way should be replaced.
Clean light alloy wheels with a brush and treat with an appropriate agent, especially in winter, but do not use aggressive, acid-containing, highly alkaline agents, abrasive cleaning agents or a washing machine with a water temperature above +60°C.
Clean seat belts only with a mild soap solution after removing them. Do not use chemical cleaners, as they will destroy the fabric. Unroll the automatic seat belt webbing only after it is completely dry.
Bottom protection and cavity preservation
The underbody of the vehicle, including the wheel arches, is covered with a protective layer. Areas in the wheel space that are particularly susceptible to impacts from stones, etc., are protected by a plastic coating.
Before the onset of cold weather and after each underbody wash, check the condition of the protective layer of the underbody and, if necessary, eliminate its defects.
Some areas of the underbody may accumulate dust, clay and sand. Remove the accumulated dirt, which in winter may also contain salt.
Engine cleaning and preservation
Before and after the winter period, when the roads are salted, the engine compartment must be cleaned and preserved.
Wash the engine only with the ignition switched off. Before washing the engine, which can be done, for example, with a cold cleaning agent or a high-pressure water jet from a washing unit, cover the generator, fuse box and brake fluid reservoir with polyethylene film.
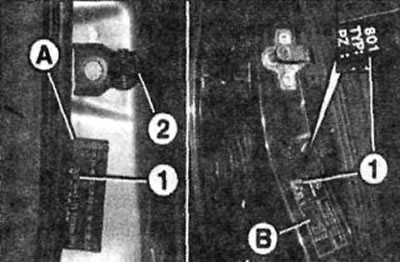
1.0. Paint coating number plate
2 - door opening stop
To reduce the risk of corrosion of the vehicle's engine compartment (for example, sidewalls, side members) and drive units, brake system parts, suspension and steering system parts located in the engine compartment, as well as body parts and cavities adjacent to the engine compartment, should be treated with high-quality preservative wax after each engine wash. At the same time, cover the V-belt of the auxiliary drive units to prevent wax from getting on it.
Caring for and cleaning seat covers
Fabric covers
Clean the covers with a vacuum cleaner and a brush. Regular stains can be removed with liquid soap, a 25% solution of ammonia or spirit vinegar.
Remove greasy and oily stains with washing benzine or stain remover. Do not wet the stain directly with the stain remover, because this will inevitably leave streaks on the fabric around the spot that was wetted with the stain remover. Treat the stain in a circle, moving from the outside in. Other stains are usually removed with warm soapy water.
Leather covers
In case of strong exposure to sunlight and long periods of parking, remove the covers to prevent them from fading.
Use a slightly damp knitted or woolen cloth to clean leather surfaces, without soaking the leather or seams completely.
Finally, wipe the damp leather with a dry, clean cloth.
Heavily soiled leather surfaces can be treated with solutions of mild detergents without bleach (2 tablespoons per 1 liter of water). Remove greasy and oily stains carefully with cleaning gasoline, without rubbing them.
Patent leather seats should be treated with a regular commercially available leather care product after cleaning. These products can be purchased at a specialist store or at an auto shop.
Before use, shake the product well and apply a thin layer with a soft cloth. After drying, wipe the surface with a clean soft cloth.
Perform this treatment once every 6 months if external influences are normal.
Repairing damage from rock strikes
Work on body repair and restoration of the car paintwork requires great skills and knowledge of both the materials themselves that need to be worked with or processed, and their application.
These skills are usually developed over many years. For this reason, this guide only covers work on eliminating minor damage to the paintwork.
When painting, use a paint that is completely identical to that applied to the car body. Even the slightest deviations in color are noticeable. The corresponding paint color is contained in the paint coating number 1 and is given in table A.
The plate is located on the driver's door pillar. Additional plate B is located on the passenger door pillar under the lock bracket (see illustration 1.0).
If, after painting the damaged areas, the original paint coating differs from the paint used during restoration work, the reason should be sought in the change in the shade of the original coating under the influence of time, solar ultraviolet radiation, sudden changes in temperature and extreme weather conditions, as well as the influence of chemical emissions, for example, in industrial areas.
In addition, surface damage, discoloration and fading of the varnish occur as a result of using paint care products that do not meet the requirements of the vehicle manufacturer.
The body paintwork is two-layered. The first layer is applied with the base paint, the second - with clear varnish.
When varnishing, a clear varnish is sprayed onto the base paint before it has dried. When performing subsequent varnishing work, there is a high risk that newly painted areas will still be visible, because even the different viscosity of the repair and original varnish leads to a change in color.
To prevent rust, it is recommended to regularly repair minor damage to the paintwork.
If small scratches do not reach the "clean" metal, it is enough to cover them with varnish of the corresponding shade. For these needs, small tubes of varnish are offered in specialized stores together with a brush.
Deeper stone chip scratches where rust has already appeared should be treated especially carefully. Use a knife or small screwdriver to remove the rust until "clean" metal appears.
There are so-called "erasers" for removing rust on the market for these purposes, which are small metal brushes.
The treated scratches should be wiped dry and degreased. To do this, the scratch itself, as well as the adjacent surface, should be cleaned with a silicone remover.
Prime the scratch using a thin brush. Considering that the primer is usually sold in aerosol cans, apply it to the can cap and dip the brush.
After the primer has dried, apply a layer of varnish with a brush. Let the paint dry thoroughly. Repeat these steps until the scratch is completely leveled with the body surface.