
Recommendations for performing work in the salon
When working with elements of interior trim, the following recommendations must be observed.
- A) Use a plastic wedge, such as HAZET 1965-20, to remove trim and trims made of synthetic materials.
- b) Replace damaged when removing the lining or missing expanding clamps with new ones.
- V) Seat belts and airbags are important elements of a car's safety system. For this reason, for reasons of safety, only the work listed in this manual may be carried out. Comprehensive repairs are recommended to be carried out in a specialized workshop.
The body pillars in the text are denoted by the letters A, B and C, counting from the engine compartment.
Attention! If, as part of the work in the cabin, electrical equipment is also being repaired, be sure to disconnect the wire terminal «masses» (-) from the battery pole. See chapter «Battery - removal and installation». The number of works with electrical equipment includes the usual disconnection of the electrical wire.
Attention! Be sure to follow the instructions regarding airbags and seat belts. This applies in particular to work carried out on the instrument panel and center console.
To prevent the airbag from deploying, it is necessary to turn off the ignition before disconnecting the airbag wire, and then first remove the wire terminal «masses» (-) from the negative terminal of the battery and only then - the terminal from the positive terminal. For safety reasons, it is recommended to insulate the negative pole of the battery.
Expanding clamps - removal and installation
Numerous elements of lining made of synthetic materials are fixed with expandable plastic clamps.
Expanding clamps can be removed and reinstalled. The expandable latch consists of the latch itself 2 and the rod 1 (see illustration 1.0).
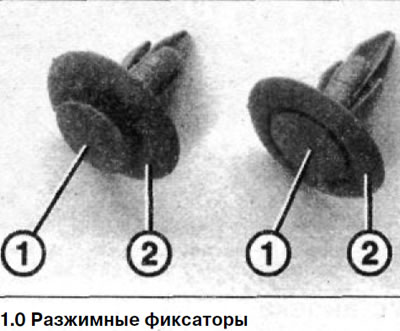
The rod is pressed in, while unclenching the support projections of the latch, which in this position ensure the strength of the fit of the latch.
Removing
1. Pry with a small screwdriver or even simply pick it up with your fingernail by the cap of the rod 1 (see illustration 1.0) and, pulling on it, slide it out of the mounting hole.
2. Pull up the pin 2 of the latch and remove it (see illustration 1.0).
Installation
3. Insert the retainer with the extended rod into the hole.
4. Press on the head of the rod. The latch will snap into place.