



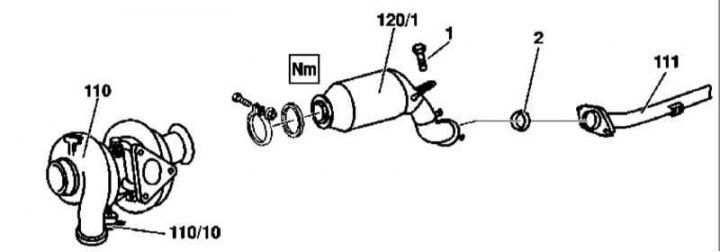
Primary Catalytic Converter Installation Details on 163.113 Models (612 series engine)
1 - Bolt; 2 - Sealing cone; 110 - Turbocharger; 111 - Exhaust pipe; 120/1 - Primary catalytic converter
1. Primary catalytic converter installation details on 163.113 models (612 series engine) are shown in the illustration, to which all references found in the text refer.
2. Remove the lower section of sound insulation.
3. Compress the disc springs with the Swedish clamps (see illustration Front Exhaust System Installation Details for 163.136 Models (111 series engine)), bend the steel tab with a screwdriver and release the spring connection of the primary catalytic converter (120/1) to the pipe (111) of the front section of the exhaust system.
4. Remove the bolt (1) securing the primary catalytic converter (120/1)
5. Remove the air cleaner.
6. Loosen the clamp securing the primary catalytic converter (120/1) to the turbocharger (110).
7. Remove the catalytic converter (120/1).
8. Installation is carried out in the reverse order - make sure that the disc springs are securely snapped into place, tighten the mounting clamp after fixing the catalytic converter on the support bracket.
Attention! Disposal of failed catalytic converters must be carried out in compliance with legal regulations!
Assembly of the front section of the exhaust system with the main catalytic converter
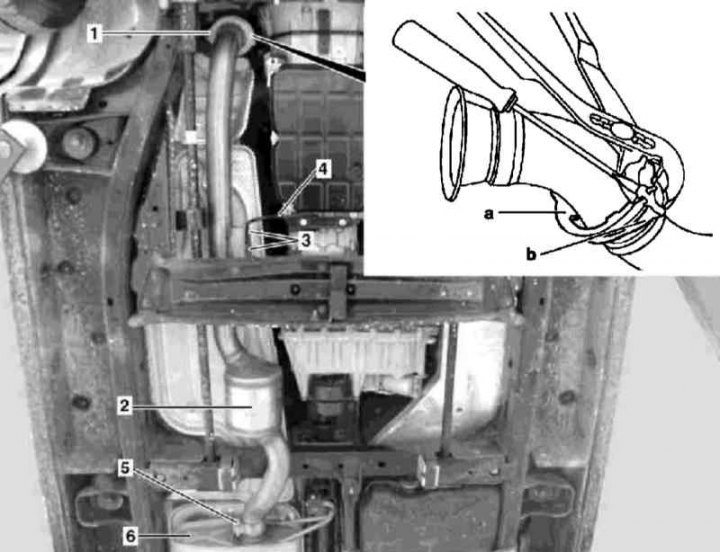
Front Exhaust System Assembly Installation Details with Main Catalytic Converter on 163.113 Models (612 series engine)
1 - Fastening clamp; 2 - Main catalytic converter; 3 - Nuts; 4 - Support bracket; 5 - Fastening clamp; 6 - Rear muffler; a, b - Disc springs
1. Installation details of the front section of the exhaust system with the main catalytic converter on models 163.128 (628 series engine) are shown in the illustration, to which all references found in the text refer.
2. Drive the car onto the lift.
3. Remove the soundproofing element installed under the transmission, but do not remove the central section of the soundproofing.
4. Using the Swedish clamps, compress the disc springs (a and b), bend the steel tab with a screwdriver and release the spring connection securing the front section pipe of the exhaust system to the primary catalytic converter.
5. Loosen the nuts (3) securing the front section of the exhaust system to the support bracket (4) on the transmission.
6. Separate the front section assembly with the catalytic converter (2) from the rear muffler (6).
7. Pull back and remove the assembly (2) from under the vehicle. Check the condition of the underbody heat shields and replace any defective components.
8. Installation is carried out in the reverse order - make sure that the disc springs are securely snapped into place, tighten the mounting clamp after fixing the catalytic converter on the support bracket.
Attention! Disposal of failed catalytic converters must be carried out in compliance with legal regulations!
M628 Assembly of the front section of the exhaust system with the main catalytic converter
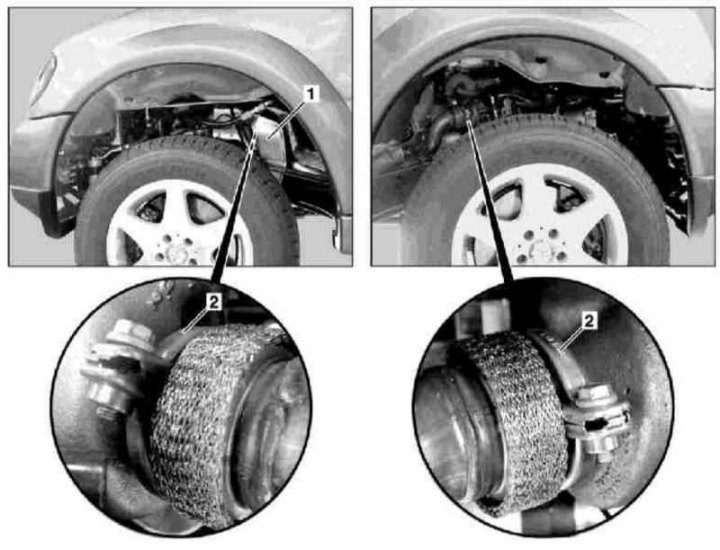
Installation details of front section assemblies of the exhaust system with catalytic converters on models 163.128 (628 series engine)
1 - Heat shield
2 - Fastening clamp
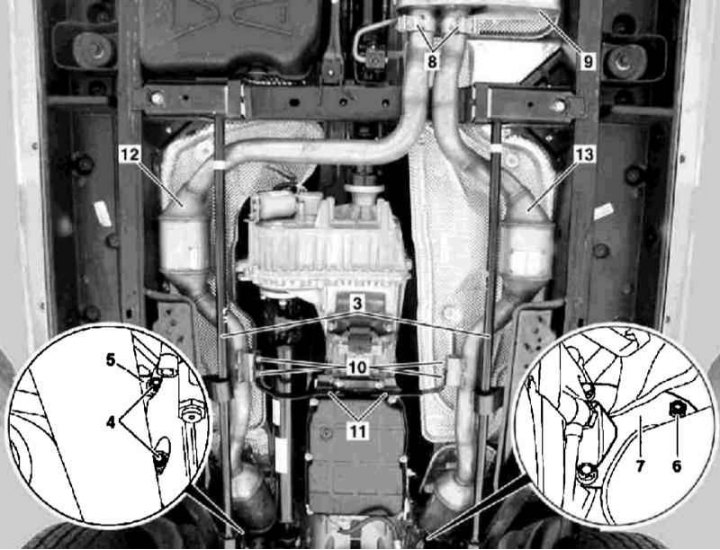
Installation details of front section exhaust system assemblies with catalytic converters on 163.128 models (628 series engine)
3 - Torsion bars; 4 - Bolts; 5 - Support bracket; 6 - Bolt; 7 - Support bracket; 8 - Fastening clamps; 9 - Rear muffler; 10 - Nuts; 11 - Support bracket; 12 - Left TWC; 13 - Right TWC
1. Installation details of front section exhaust system assemblies with catalytic converters on 163.128 models (628 series engine) are shown in the illustrations, to which all references found in the text refer.
2. Drive the car onto the lift.
3. Remove the front wheels and wheel arch protectors.
4. Remove the heat shield (1) - for the left section only.
5. Remove the soundproofing element installed under the transmission; do not remove the central section of the soundproofing.
6. Remove the torsion bar (3).
Attention! Only the rod located on the same side as the section of the exhaust system being replaced is removed!
7. Unscrew the bolts (4) of the bracket (5) - only for the left section.
8. Unscrew the bolt (6) of the bracket (7), - only the right section.
9. Loosen the welded clamp (8) securing the front section to the muffler.
10. Loosen the nuts (10) securing the front section to the support bracket (11) on the transmission housing - the nuts must be replaced without fail.
11. Support the transmission and remove the rear powertrain support (see Chapter Engine).
[Article text obtained from the website MERCEDESMAN]
12. Separate the front section from the exhaust manifold/turbocharger and rear muffler and remove it from under the vehicle.
13. Installation is carried out in reverse order.
Attention! Disposal of failed catalytic converters must be carried out in compliance with legal regulations!