




Front Exhaust System Installation Details for 163.136 Models (111 series engine)
9/1 - Rubber suspension; 10 - Exhaust system suspension bracket on transmission housing; 11/1 - Bolts; 11/2 - Nuts; 158 - Three-way catalytic converter (TWC)
Note: The front section includes a three-way catalytic converter (TWC).
1. Installation details of the front section exhaust system assembly with three-way catalytic converter (TWC) on 163.136 models (111 series engine) are shown in the illustration, to which all references found in the text refer.
2. Support the transmission and remove the rear powertrain mount (see Chapter Engine).
3. Loosen the nuts (11/2) securing the front section of the exhaust system to the support bracket (10).
4. Unbolt the bracket (10) from the transmission housing.
5. Release the welded clamp securing the rear section to the front.
6. Remove the front section from the rubber hangers (9/1). Assess the condition of the hangers, replace any defective elements.
7. Separate the front section assembly from the rear section and remove it from under the car. Check the condition of the underbody heat shields, replace any faulty components.
8. Installation is carried out in reverse order.
Attention! Disposal of failed catalytic converters must be carried out in compliance with legal regulations!
M112/113 (except ML 55 AMG)
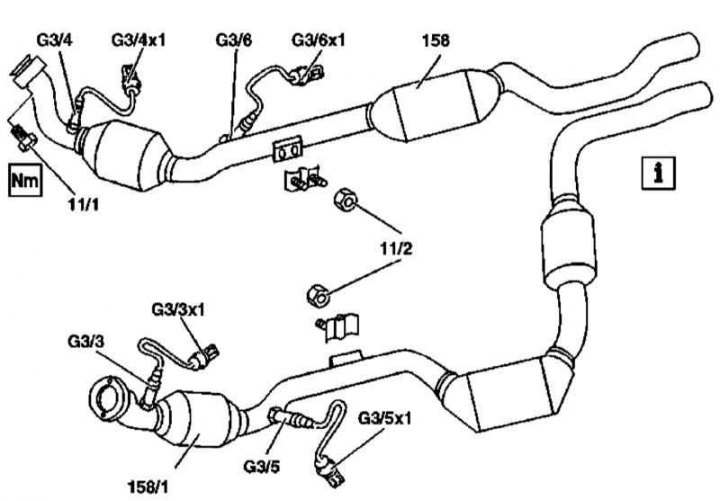
Installation details of the front section of the exhaust system on models with engines of the 112 and 113 series, except ML 55 AMG
11/1 - Bolts; 11/2 - Nuts; 158 - Rear TWC; 158/1 - Front TWC; G3/3 - Left pre-catalytic lambda probe; G3/3x1 - Contact connector for left pre-catalytic lambda probe wiring; G3/4 - Right pre-catalytic lambda probe; G3/4x1 - Right pre-catalytic lambda probe wiring connector; G3/5 - Left post-catalytic lambda probe; G3/5x1 - Contact connector for left post-catalytic lambda probe wiring; G3/6 - Right post-catalytic lambda probe; G3/6x1 - Right post-catalytic lambda probe wiring connector
Note: Each front section consists of two (front and back) three-way catalytic converters (TWC).
1. Installation details of the front sections of the exhaust system on models equipped with 112 and 113 series engines (except ML 55 AMG), are shown in the illustration, to which all references found in the text refer.
2. Jack up the front of the car and place it on supports.
3. Disconnect the electrical wiring from the diagnostic sensors.
4. Loosen the welded clamps and separate the front sections of the exhaust system from the rear.
5. Loosen the nuts (11/2) securing the front sections of the exhaust system to the bracket on the transmission housing - the nuts must be replaced without fail.
6. Remove the front wheels and wheel arch protectors.
7. Unscrew the bolts (11/1) and separate the front section exhaust pipes from the engine exhaust manifolds - replace the manifold nuts if necessary.
8. Remove the released front sections from under the vehicle.
9. Installation is carried out in reverse order.
Attention! Disposal of failed catalytic converters must be carried out in compliance with legal regulations!
ML 55 AMG models
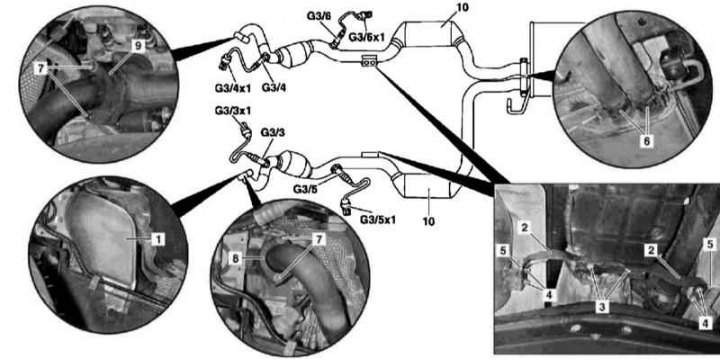
Installation details of the front section of the exhaust system on ML 55 AMG models
1 - Heat shield; 2 - Holder; 3 - Bolts; 4 - Nuts; 5 - Threaded bar; 6 - Fastening clamps; 7 - Bolts; 8 - Flange connection of the left inlet pipe; 9 - Flange connection of the right inlet pipe; 10 - Catalytic converters (TWC); G3/3 - Left pre-catalytic lambda probe; G3/3x1 - Contact connector for left pre-catalytic lambda probe wiring; G3/4 - Right pre-catalytic lambda probe; G3/4x1 - Right pre-catalytic lambda probe wiring connector; G3/5 - Left post-catalytic lambda probe; G3/5x1 - Contact connector for left post-catalytic lambda probe wiring; G3/6 - Right post-catalytic lambda probe; G3/6x1 - Right post-catalytic lambda probe wiring connector
Original published on the website mercedesman
Note: Each front section consists of two (front and back) three-way catalytic converters (TWC).
1. The installation details of the front sections of the exhaust system on the ML 55 AMG models are shown in the illustration to which all references in the text refer.
2. Remove the front wheels and wheel arch protectors.
3. Remove the front springs.
4. Disconnect the electrical wiring from the lambda probes.
5. Unscrew the fastening bolts (3), loosen the nuts (2) and remove the support bracket (2), - check the condition of the threaded strips (5), replace them if necessary, the nuts must be replaced without fail.
6. Loosen the welded fastening clamps (6) - the clamp nuts must be replaced without fail.
7. Disconnect the front sections of the exhaust system from the rear.
8. Unscrew the bolts (7) of the flange connections (8 and 9), separate the inlet pipes from the exhaust manifolds and remove the front section of the exhaust system from under the car - try not to damage the heat shields, if necessary, replace the manifold nuts and flange bolts.
9. Installation is carried out in reverse order.
Attention! Disposal of failed catalytic converters must be carried out in compliance with legal regulations!