
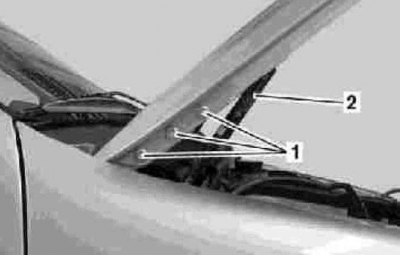
Hood installation details
1. Details of the hood installation are shown in Ref. an illustration to which all references in the text refer.
2. Open the hood and lock it in an upright position.
3. Mark the position of the hinges on the hood.
4. Remove the gas-filled stop (2) hood fixings (see Section Removal and installation of a gas-filled stop for fixing the hood in the open position), - take care of fixing the hood in a vertical position (if necessary, use the help of an assistant).
5. Remove the fixing screws (1) and together with an assistant, remove the hood.
6. Installation is carried out in reverse order, fixing screws should be painted after installation. Finally, adjust the hood (see below).
Adjustment
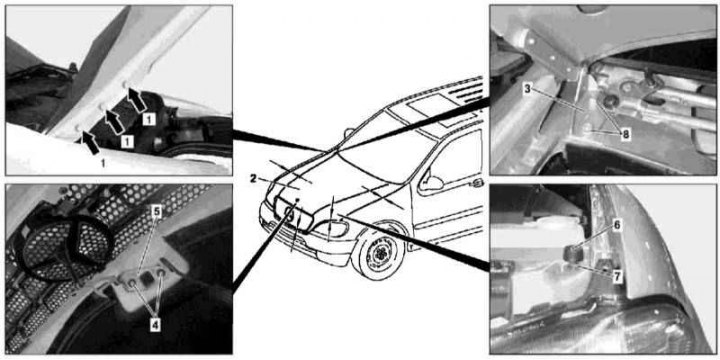
Hood adjustment
1 - Screws; 2 - Hood; 3 - Loop; 4 - Screws; 5 - Upper section of the hood lock; 6 - Thrust buffer; 7 - Locknut; 8 - Nuts
1. The relevant illustrative material is presented in the illustration, which includes all references in the text.
2. Open the hood (2) and loosen the loops (3) screws (1).
3. Align the hood with the edges of the opening of the engine compartment and re-tighten the fixing screws (1).
4. Detach from the hood (2) gas-filled stop (see Section Removal and installation of a gas-filled stop for fixing the hood in the open position) and lower it into the engine compartment.
5. Remove the air intake cover (see Section Removing the front wiper drive).
6. Remove the rubber pads of the hood hinges - the pads must be replaced without fail.
7. Cut the seal around the hinge in such a way as to ensure the free movement of the latter - the seals must be replaced without fail, the seal must be painted during installation.
8. Release the loops (3) nuts (8).
9. Adjust the hood so that it closes flush with the surfaces of the wings - in order to increase the adjustment travel, loosen the fastening of the upper section of the hood latch (5).
10. Tighten the fixing nuts (8) and connect a gas-filled stop to the hood (see Section Removal and installation of a gas-filled stop for fixing the hood in the open position).
11. Loosen locknuts (7) adjust the height of the stop buffers (6) in such a way that the front edge of the closed hood, pressing against them, does not protrude above the surface of the wings.
12. Having achieved the desired result, tighten the locknuts (7).
13. Loosen the screws (4) fastenings of the top section of the lock of a cowl (5) adjust the locking gap.
14. Align the top section (5) relative to the bottom and tighten the fixing screws (4).
15. Make sure that the hood is securely locked in the closed position.
16. Release the latch and make sure that the safety hook is securely fixed to the frame cross beam.
17. Close the hood.