



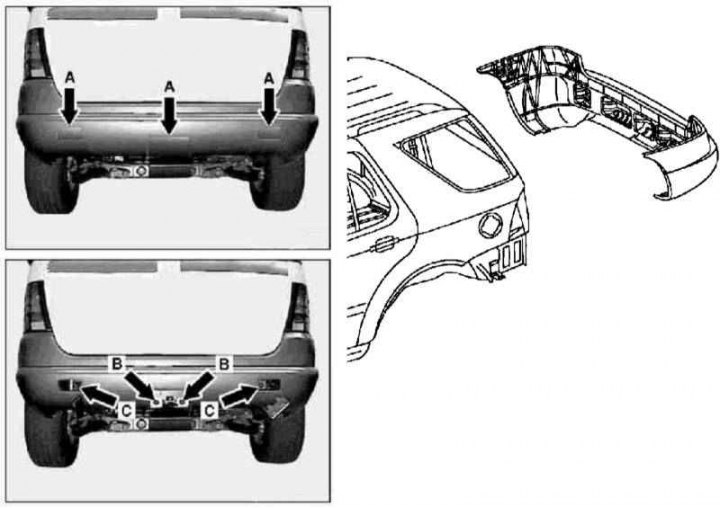
Rear bumper installation details for standard (non-AMG) models without external spare wheel carrier
A - Lids; B - Nuts; C - Screws
1. The installation details of the rear bumper on standard (non-AMG) models without external spare wheel carrier are shown in the illustration to which all references in the text refer.
2. If equipped, disconnect the emergency call system (E-call) antenna cable connector located under the right C-pillar side panel at the jacking point.
3. Using a suitable wedge, remove the covers and loosen the nuts (E) and screws (C).
4. If equipped, loosen the mudguard mounting nut.
5. Pull back and carefully remove the bumper, being careful not to damage the paintwork.
6. If equipped, remove the emergency call antenna (E-call) from the right side of the vehicle body.
7. Installation is carried out in the reverse order, make sure that the bumper is correctly positioned relative to the tailgate and rear combination lights.
Standard models without external spare wheel carrier
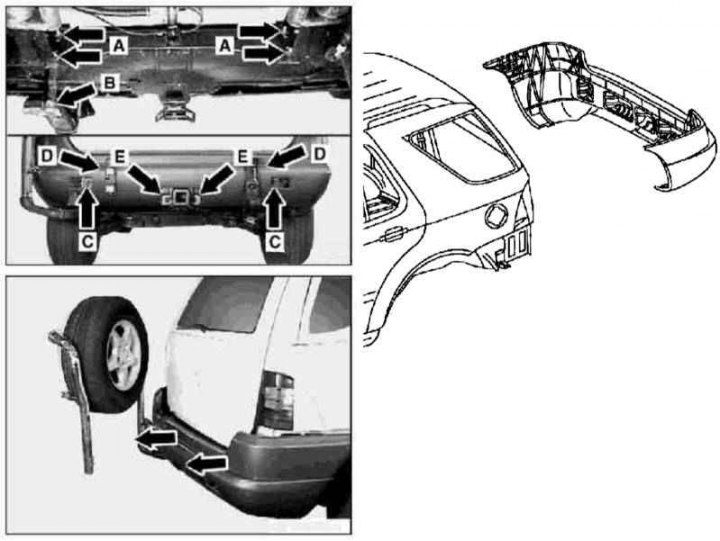
Rear bumper installation details for standard (non-AMG) models equipped with external spare wheel carrier
1. The installation details of the rear bumper on standard (non-AMG) models equipped with an external spare wheel carrier are shown in the accompanying illustration, to which all references in the text refer.
2. If equipped, disconnect the emergency call system (E-call) antenna cable connector located under the right C-pillar side panel at the jacking point.
3. Loosen nuts (A) and (B) on the underbody of the vehicle behind the frame cross member.
4. Remove the bolts securing the console brackets (D) of the spare wheel carrier.
Note: The bolts secured with nuts (A) can be pushed out from the rear of the cross member.
5. Remove the spare tire carrier console brackets (D) (see Section Removal and installation the outer spare wheel carrier (with appropriate equipment)).
6. Carefully remove the 3 bumper panels, being careful not to damage the paintwork or clips.
7. If equipped, remove the rear mudguard nut.
8. Pull the spare wheel holder back as far as it will go, then move it back and carefully remove the bumper, being careful not to damage the paintwork.
9. If equipped, remove the emergency call antenna (E-call) from the right side of the vehicle body.
10. Installation is carried out in the reverse order, make sure that the bumper is correctly positioned relative to the tailgate and rear combination lights.
AMG trim models
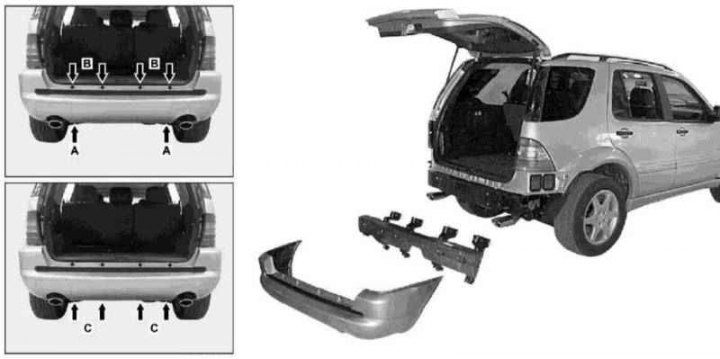
Rear bumper installation details for AMG trim models
1. The installation details of the rear bumper on AMG models are shown in the accompanying illustration, to which all references in the text refer.
2. If equipped, disconnect the emergency call system (E-call) antenna cable connector located under the right C-pillar side panel at the jacking point.
3. Remove the screws (A) securing the shock absorber mounting brackets to the bottom of the cross member.
4. Remove the decorative cover (Velcro) and unscrew the screws (B) located along the upper edge of the bumper.
5. Pull back and carefully remove the bumper - try not to damage the paintwork or electrical wiring - if equipped, remove the rubber seal on the left side of the body and disconnect the Parktronic system electrical wiring connector.
6. If equipped, remove the emergency call antenna (E-call) from the right side of the vehicle body.
7. Installation is carried out in the reverse order, make sure that the bumper is correctly positioned relative to the tailgate and rear combination lights.