
Vehicles with a gasoline engine.
Depending on the type of engine, the car can be equipped with one or two lambda probes that regulate the CO content in the exhaust gases. One lambda probe is installed in front of the catalyst, and the second - after the catalyst.
Attention! The connecting wires of the lambda probes must not be repaired or soldered. If the wire is damaged, the lambda probe must be replaced together with the wire.
Removing
Attention! There is a risk of injury when jacking up and placing the vehicle on jack stands. Familiarize yourself with the safety precautions outlined in the chapter «car jacking».
1. Jack up the vehicle and place it on jack stands.
2. Disconnect the plug 1 of the lambda probe 2, releasing the wire from the mount (see illustration).
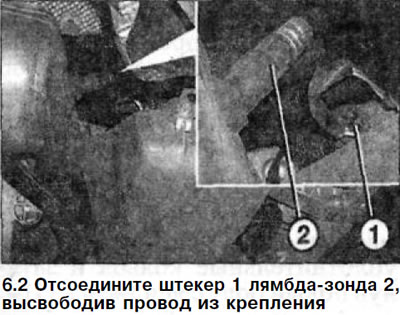
Attention! The illustration shows a lambda probe in front of the catalytic converter. If a second lambda probe is installed, then it is removed in the same way.
3. Unscrew the lambda probe with a 22 mm wrench.
Installation
Attention! When replacing a lambda probe, purchase a probe of the same modification as the previous one.
4. Clean the lambda probe thread.
5. Apply a thin layer of BOSCH special grease to the threads of the lambda probe.
Attention! Grease must not get into the slots or holes on the probe body. Do not touch the body of the new lambda probe, so as not to contaminate it. New probes are supplied with special grease applied.
Attention! When installing a lambda probe without high-temperature grease, it eventually burns on the seat and it is almost impossible to unscrew such a probe.
6. Screw in the lambda probe and tighten it with a force of 55 Nm.
Attention! A 22 mm wrench and socket torque wrench are required to tighten the probe to the correct torque.
7. Connect the probe wires, arranging them so that they do not fray and secure with wire ties.
8. Lower the car on wheels.