
Removing
When working on the fuel supply system, the following cleanliness and safety precautions must be carefully followed:
- No open flames or sparks near the workplace!
- No smoking!
- The workplace must be equipped with a fire extinguisher!
- Make sure the workplace is well ventilated. Fuel fumes are poisonous.
- The fuel system is under pressure. When the system is opened, fuel may be ejected. Collect leaked fuel with a rag. Wear protective goggles when performing work.
1. Disconnect the wire terminal «masses» (-) from the negative terminal of the battery when the ignition is off.
Attention! When the battery is disconnected from the radio, the security code is deleted, as well as all automatic settings on the radio. If the code is unknown or not written down, the only way to put the radio into operation is with the assistance of a workshop or the manufacturer of the radio. Therefore, first make sure that the code is known.
2. Remove the air filter, see relevant chapter.
3. Release the wires of the fuel injectors, marking the mounting points of the clamps in order to subsequently install them in the same places.
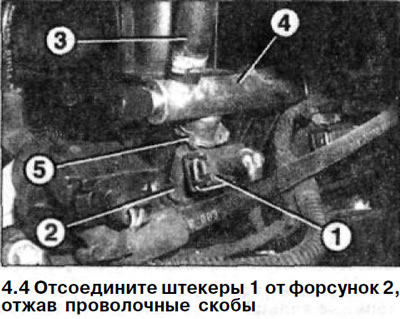
4. Disconnect plugs 1 from injectors 2 by squeezing out the wire clips (see illustration).
5. Relieve the pressure in the fuel system, see relevant chapter.
6. Disconnect the supply hose 3 from the distribution line 4 by loosening the fastening clamp and sliding the clamp onto the hose (see illustration 4.4).
7. Disconnect the fuel distribution line by unscrewing the two socket head bolts and, together with the fuel injectors, separate it from the intake manifold.
8. Remove the retaining clip 5 on the side of the injector and remove the injector from the fuel distribution line (see illustration 4.4).
Installation
9. Put on the injectors 2 new O-rings 3 and 4 and lubricate them with a thin layer of engine oil (see illustration).
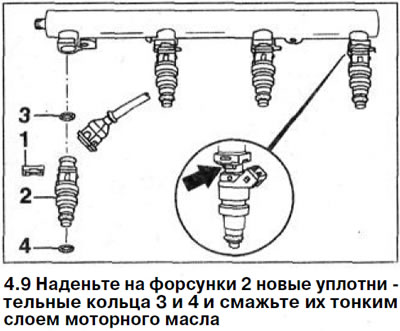
10. Install the nozzles on the distribution fuel line and secure with clips 1 (see illustration 4.9).
The clip is installed so that it locks into the rectangular rail on the nozzle (see arrow in illustration 4.9).
11. Connect the fuel distribution line with fixed injectors to the intake manifold and secure it with a force of 15 Nm.
12. Connect the fuel hose to the fuel distribution line and secure it with a clamp.
13. Connect the plugs to the fuel injectors and fix them with clamping brackets. Lay and secure the wires as they were laid before removal.
14. Install the air filter.
15. Connect wire terminal «masses» (-) to the negative terminal of the battery, after making sure that the ignition is turned off.
16. Set up the digital clock.
17. Enter the security code into the radio.
18. Start the engine and check the tightness of the connections.