
Cars BMW Cars Volkswagen Cars Chevrolet Cars Land Rover Cars Lada Cars Honda Cars Peugeot
English Русский
Български
Беларускі
Український
Српски
Hrvatski
Română
Polski
Slovenský
Magyar
Bookmark News and articles Sitemap Feedback Site search
MercedesMan.ru


A-Class C-Class E-Class G-Class M-Class S-Class Others
W168 (1997-2004)
  • Main
  • A-Class
  • W168 (1997-2004)
  • Transmission
  • Transmission
  • Gear shift mechanism — removal and installation

Gear shift mechanism — removal and installation (Mercedes-Benz A-Class W168)

0
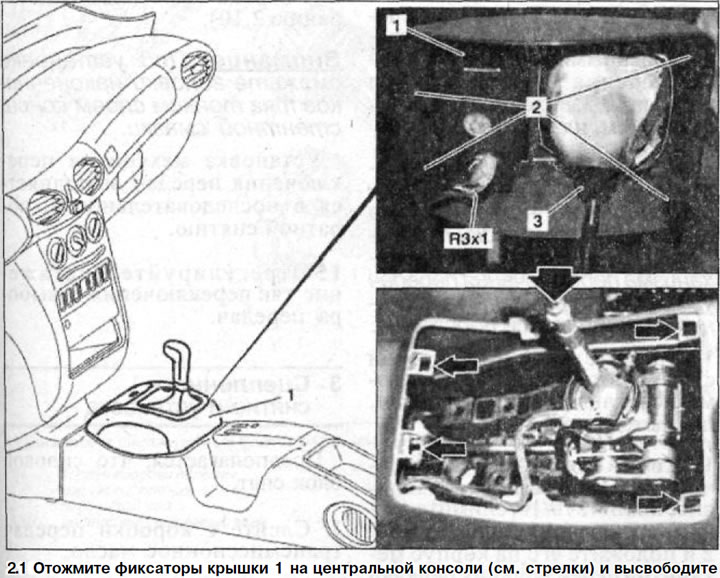
1. Press the latches of cover 1 on the center console (see arrows in the illustration) and remove the lid.

1. Press the latches of cover 1 on the center console (see arrows in the illustration) and remove…


2. Disconnect the R3 x 1 plug (see illustration 2.1).

3. Remove ball head 3 from the gear shift lever by turning it clockwise (see illustration 2.1).

4. Remove cover 1 from the center console (see illustration 2.1).

5. Remove the front or rear section of the center console, depending on the model.

6. Unscrew the bolts securing the strut that connects the front beam to the bottom.

7. Lower the power unit onto the front beam.

Attention! Prepare four bolts to attach the engine, lowered down on the front beam, to the bottom.


8. Secure the engine, lowered down on the front beam, to the bottom.

9. Remove the engine guard from the front beam.

10. Disconnect the gear shift rod 10/2 and the gear selection rod 10/3 by unscrewing the nut 10/1 clockwise (see illustration).
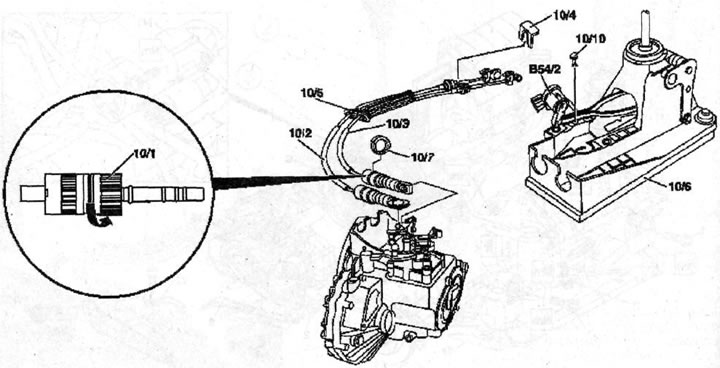
2.10 Disconnect gear shift rod 10/2 and gear selection rod 10/3 by unscrewing nut 10/1 clockwise

2.10 Disconnect gear shift rod 10/2 and gear selection rod 10/3 by unscrewing nut 10/1 clockwise
10/4 - bracket
10/5 - case
10/6 - gear shift mechanism
10/7 - spacer ring
10/10 - cotter pin for fastening the gear shift sensor
654/2 - Gear shift sensor. Only vehicles with automatic clutch


11. Remove the 10/6 gear shift mechanism together with the 10/2 gear shift and 10/3 gear selection rods connected to it, moving it into the passenger compartment (see illustration 2.10).

Caution! Before removing the gearshift mechanism, disconnect the 10/5 boot on the rods from the engine compartment bulkhead. When installing the gearshift mechanism, set the shift lever to the neutral position.


12. Remove the 10/4 clamp that secures the rods to the gear shift mechanism (see illustration 2.10).

13. Vehicles with automatic clutch. Remove the 10/10 cotter pin, remove the B54/2 gear shift sensor and place it on the gear shift housing (see illustration 2.10).

14. Disconnect the 10/2 shift rod and 10/3 gear selection rod from the 10/6 gear shift mechanism (see illustration 2.10).

Caution: When installing, lubricate the tie rod ends with a thin layer of grease.


The gear shift mechanism is installed in the reverse order of removal.

15. Adjust the tension of the shift and gear selection rods.
This article is available at: russian, bulgarian, belarusian, ukrainian, serbian, croatian, romanian, polish, slovak, hungarian
The article has been verified: Lukyanov Nikita Ilyich
Share with friends:
◀ Previous
A-Class W168 / Transmission
Next ▶

Manual gearbox — removal and installation
Manual Transmission Specifications
Clutch — removal and installation
Differential, primary and secondary shafts — removal and installation
Automatic transmission — removal and installation
Gear Selector Cable — Removal and Installation
Gearbox parking lock mechanism
More similar articles for repairing other models

☛ Gear shift rod Mercedes W202 (1993-2000)
☛ Gear shift mechanism — removal and installation Mercedes W124 (1984-1995)
☛ Replacement of the auxiliary drive belt and elements of its… Mercedes W463 (1999-2019)
☛ Adjustment of the gear shift drive RCPP 717.461 Mercedes W163 (1997-2005)
☛ Adjusting the gear shift mechanism Mercedes W140 (1991-1998)
☛ Internal gear shift mechanism Mercedes Vito 2 (2003-2014, diesel)
Link in different formats to this article
Comments and feedback from visitors
No comments yet


How much will 10 + 25 ?


W168 (1997-2004) 
  • General information
  • User manual
  • Maintenance
  • Troubleshooting
  • Power unit
  • Engine repair
  • Cooling and heating
  • Injection system (gasoline)
  • Fuel system (diesel)
  • Fuel system
  • Exhaust system
  • Ignition system
  • Transmission
  • Clutch
  • Transmission
  • Chassis
  • Brake system
  • Suspension
  • Steering
  • Body
  • Interior (all models)
  • Interior (since 1997)
  • Interior (since 2001)
  • Exterior
  • Doors and windows
  • Electrical equipment
  • Equipment and devices
  • Power devices
  • Windshield wipers and washers
  • Headlights and lighting
  • Electrical circuits
 
MercedesMan.ru © 2017–2026 · Mobile version · Read about Mercedes · Sitemap: EN BG BY UA RS HR RO PL SK HU · Feedback · Site search · Bookmark A-Class (W168) · C-Class (W201) · C-Class (W202) · C-Class (W203) · E-Class (W123) · E-Class (W124) · E-Class (W210) · G-Class (W463) · M-Class (W163) · S-Class (W116, petrol) · S-Class (W126, petrol) · S-Class (W140) · S-Class (W220) · Sprinter · Vito 1 · Vito 2 · Vario 814D ·
 
We only use cookies without which some of the site's features may not be available.