



Contents: Front differential ↡ Rear differential ↡
Attention! All self-locking bolts and nuts must be replaced without fail!
Front differential
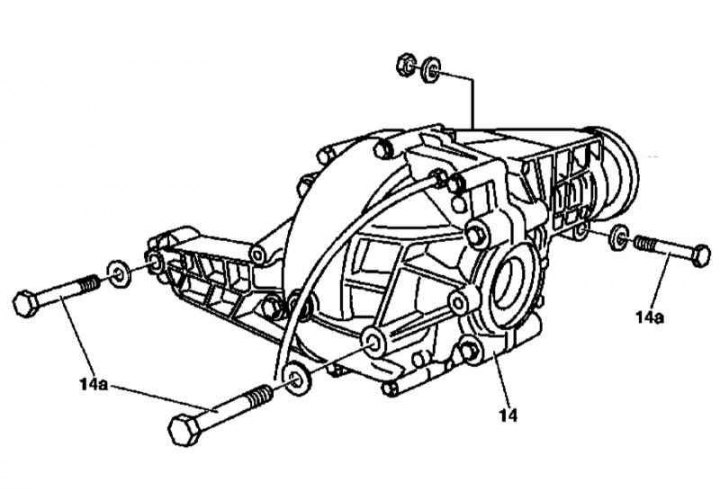
Front Differential Installation Details
1. Front differential installation details are shown in the illustration to which all references in the text refer.
2. Remove the front wheels.
3. Unscrew the corresponding plug and drain the oil from the differential.
4. Unbolt the front cardan shaft from the connecting flange of the drive gear, and tie the shaft to the frame.
5. Using a puller, release both upper ball joints from the corresponding suspension arms, check the condition of the dust boots, assess the degree of wear of the supports, and replace them if necessary.
6. Remove the engine compartment trim panels.
7. Release both drive shafts from the differential, being careful not to damage the shields.
8. Disconnect the ventilation hose from the differential housing.
9. Remove the mounting bolts (14a) and remove the front differential assembly (14).
10. Installation is carried out in reverse order.
11. Finally, check the differential for signs of developing leaks.
Rear differential
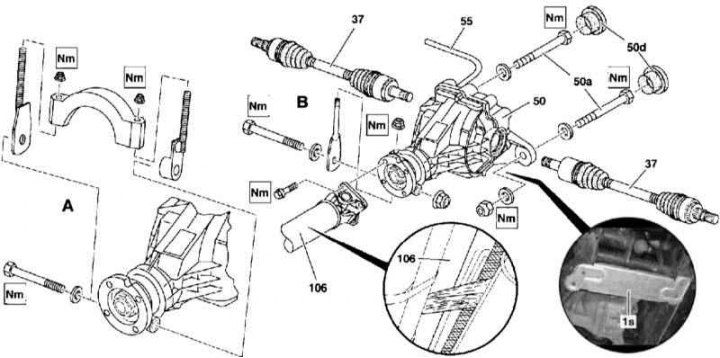
Rear Differential Installation Details
1s - Shield; 37 - Drive shafts; 50 - Rear differential; 50a - Mounting bolts; 50d - Lids; 55 - Ventilation hose; 106 - Rear propeller shaft; A - Models produced up to 05.98; B - Models produced since 06.98
1. The details of the rear differential installation are shown in the illustration, to which all references in the text refer.
[Article obtained from this portal: mercedesman]
2. Remove the drive shafts (37).
3. Unscrew the mounting bolts and disconnect the propeller shaft (106) from the connecting flange of the rear differential drive pinion (50), - tie the shaft to the vehicle frame.
4. Release the ventilation hose (55) from the retainers on the fuel tank, except for models equipped with an additional fuel tank (ML 55 AMG), on which the hose can only be released after lowering the differential.
5. Remove the covers (50d) of the mounting bolts.
6. On ML 55 AMG models, remove the shield (1s) located on the left side of the differential assembly.
7. Support the rear differential assembly (50).
8. Remove the rear differential to axle carrier (A/B) suspension components.
9. Loosen the mounting bolts (50a), lower the differential assembly (50) down and remove it from under the vehicle - on ML 55 AMG models, do not forget to release the ventilation hose from the clips on the fuel tank after lowering the differential assembly.
10. Assess the condition of the front and rear rubber mounts in the rear axle holder; replace them if necessary.
11. Installation is carried out in reverse order.
12. Finally, check the differential for signs of developing leaks.